jbeletti's 2015 Landmark 365 Ashland

Jesstruckn/Jesstalkn

Well-known member
The lighted pump switch is a good idea.
Let me through a few more at you
#1) If you use one of the blue accent lights, like we have on the floor in the hallway and on the bottom of the island. And mount it above your switch cluster ... You could wire it to the accent light switch so it's only on when they are on, or wire it to it's own switch.
#2) a motion sensor like I've been using in my pantry and my entry closest. I'm really happy with there operation.
They are very sensitive so if you don't want the lights to come on every time you move then you might want to, either put a switch to override it or mount it in a sheltered place in the hallway.


Sent from my XT1254 using Tapatalk
 

JBoyerinAbq

Active Member
The accent light is a great thought. I might wire it to the "steps" light as we always turn that on at night to take the dogs out. Thanks for chiming in.

Jbeletti - if I were to use the water heater switch, and idea how I'd wire it so the light was ON when the switch was OFF?

Thanks all! Safe travels.
 

jbeletti

Well-known member
The accent light is a great thought. I might wire it to the "steps" light as we always turn that on at night to take the dogs out. Thanks for chiming in.

Jbeletti - if I were to use the water heater switch, and idea how I'd wire it so the light was ON when the switch was OFF?

Thanks all! Safe travels.

Jeff - I'd need to see a schematic to say yes, it would work (light on when switch is off. If light is wired externally, should be doable.
 

danemayer

Well-known member
Re: MOD: Water Filtration and Reverse Osmosis System

I think the LED switches just have one extra connection which goes to ground. The LED is attached between the incoming hot pin and the ground pin. When ON, all the current flows through the switch. When OFF, a little current flows through the LED to ground, lighting it up.
 

jbeletti

Well-known member
My Mods: Water Pump Switch and Status LED Project

Today, I finalized some work on a 5-month old project :) Here's a link to that project (Water Pump Switch and Status LED)
 

jbeletti

Well-known member
MOD: Water Filtration and Reverse Osmosis System

I've made some progress over the last couple of days on the Reverse Osmosis System prep work. Most of this work has been reworking the mounting of my fresh water tank and gray tank 1 and the installation of a float switch in each of those tanks. Still pondering how I will seal the frame-to-frame cut in the coroplast. Here's a link to the udpates (w/ pics) > link
 
Last edited:

Jesstruckn/Jesstalkn

Well-known member
Re: My Mods: Water Pump Switch and Status LED Project

Today, I finalized some work on a 5-month old project :) Here's a link to that project (Water Pump Switch and Status LED)
Nice work Jim
I still have all of the parts in a drawer here at home maybe I'll get to it some day. I have to find a way to hide the switch's as DW doesn't want to see them.

Sent from my XT1254 using Tapatalk
 

Bones

Well-known member
Looks good

- - - Updated - - -

I've made some progress over the last couple of days on the Reverse Osmosis System prep work. Most of this work has been reworking the mounting of my fresh water tank and gray tank 1 and the installation of a float switch in each of those tanks. Still pondering how I will seal the frame-to-frame cut in the coroplast. Here's a link to the udpates (w/ pics) >link
This link takes me to your water pump update and not your RO update
 
Last edited by a moderator:

Bones

Well-known member
Re: Mod: Relocated 2 Ceiling Lighting Switches

A lot of work there. Did you add the straps on your own or were they something added at the factory?
 

jbeletti

Well-known member
Re: Mod: Relocated 2 Ceiling Lighting Switches

A lot of work there. Did you add the straps on your own or were they something added at the factory?

The fresh water tank has 3 heavy gauge bent steel straps - from the factory.

The gray 1 water tank has 3 light gauge, sort of flexible steel straps - from the factory.
 

jbeletti

Well-known member
MOD: Refer Door Status feature

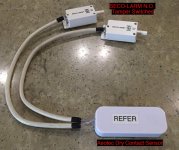
Those with the residential refrigerators know that residential refers aren't manufactured with travel latches. And you MUST latch those doors for travel. Heartland has used various latch types over the last couple years. I have a real good one that we like (link).

But - you MUST USE the latch for it to work. Some may recall our Pickle Incident :) Well, once again, a couple months ago - our refer door came open during travel due to "someone" not relatching it after lunch.

I'm thinking that "maybe", if I know the door has broken the seal and come open, that I might be able to pull over in time to prevent some of the carnage.

I am already running a Home Automation hub in the RV and I maintain a Verizon JetPack in here as well, so I generally always have Internet access to the coach.

I had everything on-hand for this project - here's the details...

Parts
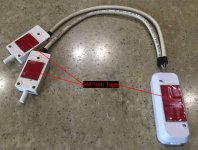
  • 1 Aeotec Dry Contact Sensor *
  • 2 SECO-LARM Normally Open Tamper Switches
  • 2 Feet 2-conductor wire
  • 3/4" wide 3M Trim Tape (three 1" pieces)
* This sensor has a Z Wave radio and needs to connect to a Home Automation system
running Z Wave protocol. I'm using a Samsung Smartthings Hub v1


Steps
  1. Wire switches in parallel with each other
  2. Wire switches to sensor (polarity is not important)
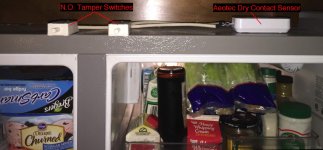
  3. Mount switches so refer doors close plungers fully when doors are closed
  4. Join sensor to Home Automation system
  5. Create any automations (notifications actions etc.)
Pictures
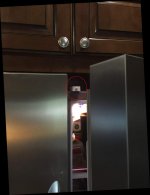
IMG_8255.jpg IMG_8256.jpg IMG_8260.jpg IMG_8263.jpg IMG_8261.jpg IMG_8262.jpg

To Do
  • Create notifications (push and sms)
  • Move switches off Dry Contact Sensor and off Smartthings and onto an Arduino Nano with a CAN BUS shield and onto a CAN BUS network monitored by a Raspberry Pi with a CAN BUS hat running some custom code by linuxkidd (our technical moderator Michael).
 
Last edited:

jbeletti

Well-known member
MOD: SeeLevel Tank Monitoring System Install

I'll be using this post to detail the installation of the SeeLevel Tank Monitoring System by Garnett Instruments.

Product Details
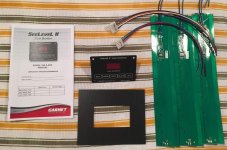
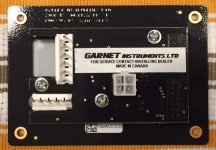
SeeLevel II Tank Monitor
Model 709-A RVC (RVC is a communications protocol for RVs based on CAN BUS)
3 Tank Senders (only 1 is planned to be used in my install)

My Requirements
Now that I am making RO (reverse osmosis) water for 100% of our RV water needs, I need to have a really good handle on how much water is in my fresh water tank and the OEM monitor panel just doesn't give me the level of detail I need.

I also want the water level to be exposed to a monitor and control system outside of the SeeLevel display so I can monitor the water level state from other devices and remotely and use that state to control RO water production.

Other Tanks
Note that due to the way the Black and Gray tanks are supported, the tank shapes are stepped. As such, I have yet to find a side of the tank that is flat from the top to the bottom. You need a flat spot the full height of the tank in order to use the SeeLevel senders. Unless/until I expose these tanks more fully, I have no plans to slap SeeLevel senders on them - only the Fresh Water tank.

Equipment Pictures
SeeLevel - Full System.jpg SeeLevel - Display - Rear.jpg

Installation Pictures
To be added after installation in the coming weeks
 

sjandbj

Well-known member
Re: MOD: SeeLevel Tank Monitoring System Install

Jim,
It appears that you just can't keep yourself from taking the bottom off the 5th wheel. Your going to be a pro at this by the time all the mods are done. I have looked at this system for many years now wanting to install it but never getting to it. I am looking forward to the install pictures.
BTW... How is the RO system working out? You took it on its first trip didn't you?

Regards,
Steve
 

Bones

Well-known member
Re: My Mods: Water Pump Switch and Status LED Project

Is there anyway to install panels instead of the solid plastic. That might make things easier.
 

jbeletti

Well-known member
Re: MOD: SeeLevel Tank Monitoring System Install

Jim,
It appears that you just can't keep yourself from taking the bottom off the 5th wheel. Your going to be a pro at this by the time all the mods are done. I have looked at this system for many years now wanting to install it but never getting to it. I am looking forward to the install pictures.
BTW... How is the RO system working out? You took it on its first trip didn't you?

Regards,
Steve

Steve - I am getting good at taking that underbelly off. I have good tools and a decent system for doing so plus plenty of new screws and fender washers when needed and of course, my new giant roll of scrim tape :)

The RO system is working out GREAT. I'll update my post on it soon.
 

jbeletti

Well-known member
Re: My Mods: Water Pump Switch and Status LED Project

Is there anyway to install panels instead of the solid plastic. That might make things easier.

Not sure what you're referring to Dave. If you mean the senders, they are flexible - not hard.

On edit: Do you mean the underbelly? On my unit, it's Coroplast (corrugated plastic - think yard sign).

A removable panel would be nice but would then require sealing at 2 seams.
 

Jesstruckn/Jesstalkn

Well-known member
Re: MOD: SeeLevel Tank Monitoring System Install

I'll be using this post to detail the installation of the SeeLevel Tank Monitoring System by Garnett Instruments.

Product Details
SeeLevel II Tank Monitor
Model 709-A RVC (RVC is a communications protocol for RVs based on CAN BUS)
3 Tank Senders (only 1 is planned to be used in my install)

My Requirements
Now that I am making RO (reverse osmosis) water for 100% of our RV water needs, I need to have a really good handle on how much water is in my fresh water tank and the OEM monitor panel just doesn't give me the level of detail I need.

I also want the water level to be exposed to a monitor and control system outside of the SeeLevel display so I can monitor the water level state from other devices and remotely and use that state to control RO water production.

Other Tanks
Note that due to the way the Black and Gray tanks are supported, the tank shapes are stepped. As such, I have yet to find a side of the tank that is flat from the top to the bottom. You need a flat spot the full height of the tank in order to use the SeeLevel senders. Unless/until I expose these tanks more fully, I have no plans to slap SeeLevel senders on them - only the Fresh Water tank.

Equipment Pictures
View attachment 44828 View attachment 44829

Installation Pictures
To be added after installation in the coming weeks


Jim guess you decided to go for it. let me know how it goes, this one is high on my list.
 
Top