jbeletti's 2015 Landmark 365 Ashland

porthole

Retired
Re: My Mods: Permanent Gate Valve added at Sewer Outlet

The products at Goshen - the hose diameter appears to be about the same as other brands.
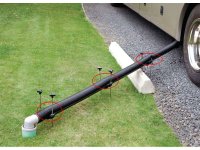
The Flow Down half pipes are sufficient size. The connectors piece though are about 1/4" too small for the hose to lay down flat. As a result there is a rise at every connection.

Just seems to me that if you are going to engineer something get all the pieces together and see how they fit.

enigneering_marvels.jpg

You can see all the rises on their website.

http://lci1.com/flow-down
 

Attachments

  • enigneering_marvels.jpg
    enigneering_marvels.jpg
    116.4 KB · Views: 84

jbeletti

Well-known member
Re: My Mods: Permanent Gate Valve added at Sewer Outlet

The products at Goshen - the hose diameter appears to be about the same as other brands.
The Flow Down half pipes are sufficient size. The connectors piece though are about 1/4" too small for the hose to lay down flat. As a result there is a rise at every connection.

Just seems to me that if you are going to engineer something get all the pieces together and see how they fit.

You can see all the rises on their website.

http://lci1.com/flow-down

I get what you're saying now:
flow_down_1.jpg

I hadn't noticed this rise, though I do see it in the picture. In practice, I've never encountered an issue with this but I do see your point. For what it's worth, Lippert didn't design this product - they recently purchased the product as I understand it. Perhaps they'll re-engineer it at some point.

On edit:
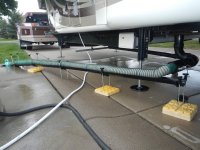
I found a picture of my own Waster Master hose and Flow Down product. I can see the small rises :) Never noticed it before.
DSCN8985.jpg
 

porthole

Retired
Re: My Mods: Permanent Gate Valve added at Sewer Outlet

I get what you're saying now:
View attachment 39156

I hadn't noticed this rise, though I do see it in the picture. In practice, I've never encountered an issue with this but I do see your point.

On edit:
I found a picture of my own Waster Master hose and Flow Down product. I can see the small rises :) Never noticed it before.
View attachment 39157


The "hills" on my hose/tray combo are a bit more pronounced then what is shown in the pictures. The hose clearly does not fit in the U-shaped connector pieces, rather the hose lays across the upper edges. The display stuff at the Lippert booth was the same way. But, I did see one hose that did fit properly, Chris W with the maroon Cyclone has one of the newer Rhino hoses and it fit well.

With the joys of waste management and the principal of **** does not flow uphill, and for the cost of the item, I would have hoped for "smoother sailing".

Now, since you posted a picture of your tray with the yellow blocks, that brings up several other concerns.
Keeping in mind that this is a product that retails for $90 and is not much more then a 10' piece of ABS pipe cut in half and sectioned at 30" with some connectors (engineering and production startup costs aside). I use the same yellow blocks, although most of mine are cut in half. At the NE rally I used probably 2 dozen pieces to supplement the rods to get the slope needed.

a) The elevation rods are not long enough. I have to use the same yellow blocks to be able to use the tray effectively. Perhaps half the rods included should be 6" longer.

b) You mentioned above that at times you wish you had another Flow Down kit. I did buy two kits at Goshen. The connectors included offer no way to join two kits together. The kits are arranged with the required number of double ended connectors and two single "end" pieces.

c) If you set up the tray to go around obstructions, such as in this video, you end up one connector short. BTW, in this video the hose fit much better then the stuff they had at the booth.

d) The connectors are designed so that after slipping one section in to the stops, inserting the next section in will tend to undo the first section.

The concept is good, the cost a bit high, setup takes a bit longer, but I will give it a few more go arounds.

I did keep my old hose support, and it is ready to go back into storage under the trailer.
I had been using the Blueline support with the yellow blocks. You are able to use half of a second Blueline kit, sliding the "inner" piece into the opposite end of an already assembled "inner/outer" tray to get a pretty good length of support (5' to 12-14'), but it has to be in a straight line.

http://www.campingworld.com/shopping/item/blueline-hose-support-protector/18352

- - - Updated - - -

For what it's worth, Lippert didn't design this product - they recently purchased the product as I understand it. Perhaps they'll re-engineer it at some point.


Yes I know, and I did bring up my concerns. And as expected it mostly fell on deaf ears. But, I did manage to wrangle out an additional connector so that I can actually join two full length kits together.
 

jbeletti

Well-known member
Duane - all great points. I've passed this to Lippert and asked them to pass this to the Flow Down product manager...

  • Flow Down does not perfectly fit Waste Master hose (hose OD is too large for Flow Down ID)
  • Connectors in Flow Down cause mini high spots in sewer hose
  • If more length is needed, apparently 2 Flow Down kits cannot be connected
  • In many cases, longer metal stakes are needed
 

porthole

Retired
Duane - all great points. I've passed this to Lippert and asked them to pass this to the Flow Down product manager...

  • Flow Down does not perfectly fit Waste Master hose (hose OD is too large for Flow Down ID)
  • Connectors in Flow Down cause mini high spots in sewer hose
  • If more length is needed, apparently 2 Flow Down kits cannot be connected
  • In many cases, longer metal stakes are needed

You could add perhaps - If the waste master hose had a removable end (cam lock) I probably would have purchased the kit.

I did think about just buying a hose extension and the all the pieces required to make my own kit. I don't care for the valve on the end. It may be ok for a "fixed" installation. But, I would dread the thought of having a closed valve (for whatever reason) and a hose full of effluent........
 

Jesstruckn/Jesstalkn

Well-known member
Ya if the end came off I might consider the hose system. Not a fan of that cradle system at all !!! It looks cheap and hokey. If and when one of those long all-thread pins gets bent and its all over. And being that long, they will get bent by somebody.
 

Bones

Well-known member
Re: My Mods: Permanent Gate Valve added at Sewer Outlet

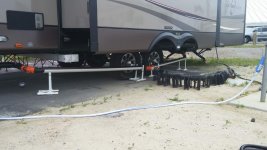
I think my small set up works pretty good.
IMG_20150711_085048.jpg
I had it configured this way because the nose of the trailer this time was about even with the rear and I couldn't get enough slope. Usually I will configure the front line to hook into the rear section then I will hook up the ground hose to the sewer drain.
 

jbeletti

Well-known member
Re: My Mods: Laptop Power Supply Holder

Received this reply from Lippert on the Duane's points that I passed to them:

I have passed on to our team and we are looking at each point.

I'll pass aling the sentiment about the non-removable nozzle.
 

porthole

Retired
it looks cheap and hokey. If and when one of those long all-thread pins gets bent and its all over. And being that long, they will get bent by somebody.

It is not cheap and hokey, actually quite well made, just needs some tweaking.
The height adjustment rods are not all threads. They are square stock, about 1/4" or so.

The only way I could see the rods geting bent is from some knucklehead tripping over and landing on them.
 

Jesstruckn/Jesstalkn

Well-known member
It is not cheap and hokey, actually quite well made, just needs some tweaking.
The height adjustment rods are not all threads. They are square stock, about 1/4" or so.

The only way I could see the rods geting bent is from some knucklehead tripping over and landing on them.

Sorry..... Cheap and hokey was a bit strong and rude. I'm just not a fan of the look.
 

'Lil Guy'

Well-known member
Re: My Mods: Permanent Gate Valve added at Sewer Outlet

Jim, after you continually upgrade your rig over the course of your time with it, where does it end up when you upgrade to your next LM? I know you take great care of it and the mods are great. Might be a good deal on a like new LM. Didn't know whether to ask this here or by PM. If you can't discuss this just disregard.
Thanks in advance.

Frank
 

TravelTiger

Founding Texas-West Chapter Leaders-Retired
Re: My Mods: Permanent Gate Valve added at Sewer Outlet

Jim, after you continually upgrade your rig over the course of your time with it, where does it end up when you upgrade to your next LM? I know you take great care of it and the mods are great. Might be a good deal on a like new LM. Didn't know whether to ask this here or by PM. If you can't discuss this just disregard.
Thanks in advance.

Frank

I believe they are posted for sale to the "public", usually on here. I'm sure Jim has specifics.


Sent from my iPhone using Tapatalk
 

cookie

Administrator
Staff member
It most likely will be advertised here, but will always be sold through a dealer.

Peace
Dave

Sent from my SM-G900V using Tapatalk
 

Jesstruckn/Jesstalkn

Well-known member
Re: My Mods: TV Cabinet LED Strip Light

Most LM365 floor plans have a large TV that is on a mount that pivots out into the room about 90 degrees. Behind the TV are 3 shelves. I find this area a bit dark for my needs. Time to add some custom lighting!

For about $30 (Lowes), I added a 36" LED strip light. I had the wire on-hand and had Heartland Customer Service send me the switch.

The LED strip itself took a minute to install. Routing the wiring from a DC power source took about an hour or two.

I had on-hand, a surface mount DC fuse panel / distribution center from an old car computer installation. I used that piece of over-kill as my DC power distribution point for this project and future DC powered projects in this area. I grabbed power from the back of the DC receptacle in the upper-left cabinet above the TV and installed the fuse panel there. I routed a DC circuit down into the wall that divides the large center space behind the TV from the tall narrow cabinet to the left of the center space.

Here's some pics...

View attachment 36952 View attachment 36953 View attachment 36951 View attachment 36950 View attachment 36956 View attachment 36959View attachment 36955 View attachment 36957 View attachment 36958 View attachment 36954
Nice clean job Jim

Sent from my XT1254 using Tapatalk
 

jbeletti

Well-known member
Selling demo coaches - how does that work?

Jim, after you continually upgrade your rig over the course of your time with it, where does it end up when you upgrade to your next LM? I know you take great care of it and the mods are great. Might be a good deal on a like new LM. Didn't know whether to ask this here or by PM. If you can't discuss this just disregard.
Thanks in advance.

Frank

Frank - Erika and Dave have it right. I advertise it here on the forum, then we have a dealer complete the transaction with the buyer. I'd expect this coach to be available towards the end of the 2016 season. If you want to be "on the list", send me a note and I will add you.

To date, no one ever on the list has ever bought one of our demos but I do like to have a list of people to start with.
 

'Lil Guy'

Well-known member
Re: My Mods: Permanent Gate Valve added at Sewer Outlet

Thanks Jim. Hopefully I can catch up to you at one of the rallys coming up so I can look at that thing. My wife toured your rig but I didn't. later and have a great day.
BTW, JB does have a great job. I might even put off retirement for one like that. I doubt my bashful demeanor would make me a good ambassador for HL.lol
 

Jesstruckn/Jesstalkn

Well-known member
Re: My Mods: Added LevelUp Wireless Controller

I learned during this year's rally in Goshen that LCI offers a Wireless Remote Control for "6-point" LevelUp. Today, I made the investment. Retail cost is about $580 plus tax. Though an LCI employee installed it for me, it was simple to do. Replace the control unit (brain) - done!

As LM 365 doen't come with a remote controller, what I gained was the ability to raise and lower the front landing gear and auto-level the coach "from a hand-held wireless controller".

For me, hitching and unhitching is quite the process of getting in and out of the truck, due to the design of the Blue Ox Bedsaver device on my Trailersaver hitch.

I'll get to try it out tomorrow!

attachment.php
attachment.php
Just found this Jim..
I will order mine soon...
Have you had any problems with it ? Is it responsive when you use it for the front jacks or is it a delayed reaction ?

Sent from my XT1254 using Tapatalk
 

jbeletti

Well-known member
Re: My Mods: Added LevelUp Wireless Controller

Just found this Jim..
I will order mine soon...
Have you had any problems with it ? Is it responsive when you use it for the front jacks or is it a delayed reaction ?

Sent from my XT1254 using Tapatalk

Funny you ask - just today I had trouble getting the coach to react to the remote. I got out of the truck, got closer to the RV and it worked. Got back in the truck and it still worked.

Next time, I may get the remote out, walk to the coach, enter my password on the remote, then get in the truck to begin the hitch process.

Seems like a range issue but only until "first contact" is made.
 

Jesstruckn/Jesstalkn

Well-known member
Ya I like the feature but, I also like the dependability of the hard wired switches. Just don't want to cause any issues. I don't mind how it is now, but it kinda sounds cool.

Sent from my XT1254 using Tapatalk
 
Top