You are using an out of date browser. It may not display this or other websites correctly.
You should upgrade or use an alternative browser.
You should upgrade or use an alternative browser.
My 2013 Landmark Key Largo
- Thread starter jbeletti
- Start date
Key Largo Modification - Relocation of light switches
In most of our coaches, many of the switches, controls and monitors are co-located in a control panel arrangement behind a cabinet door. Same in my 2013 Landmark Key Largo.
As I have done in the last couple of demo coaches, I just completed the relocation of 2 frequently used light switches.
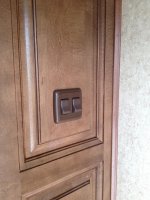
I added a double light switch on the end of my pantry cabinet for the Kitchen and Living Room lights.
Here's what I did to accomplish this modification:
Attached are a few photos of this modification.
Jim
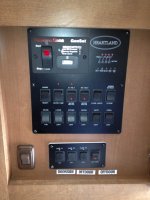
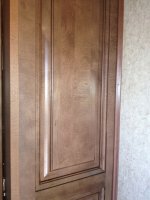
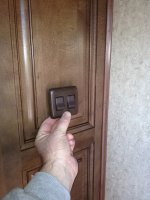
In most of our coaches, many of the switches, controls and monitors are co-located in a control panel arrangement behind a cabinet door. Same in my 2013 Landmark Key Largo.
As I have done in the last couple of demo coaches, I just completed the relocation of 2 frequently used light switches.
I added a double light switch on the end of my pantry cabinet for the Kitchen and Living Room lights.
Here's what I did to accomplish this modification:
- Obtained double light switch (got this from Heartland)
- Determined ideal (for me) location for switch placement
- Inspected area behind new switch location to ensure depth clearance, no obstructions and access to existing wiring
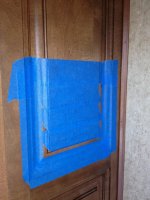
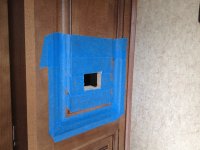
- Masked off new switch location with wide blue painter's masking tape. This serves as a canvas to mark measurements on and serves as protection for the wood when drilling and cutting
- Pulled switch control panel off the cabinet, removed wires (2 each) from exiting Kitchen and Living Room light switches. Marked each set as KIT and LR. Passed wires to area behind new switch location
- Carefully measured back of new switch (double) and transfered measurements to masking tape in precise location of new switch location
- Drilled 1/4" holes inside each of the 4 corners of the cut-out of the new switch location
- Used portable jig saw to cut out the rectangle of wood in the cabinet end panel in order to mount the back recess of the new switch. I inserted the jig saw blade into one of the holes I drilled and cut from hole to hole
- Dry fit new switch to ensure fitment, then removed masking tape and cleaned wood dust from cabinet
- Passed wiring through new switch cutout and connected to terminals on back of switches. The terminals on the end of the original wiring are female spade terminals. These terminals mate right up with the new switches, so no new terminals, splicing or rewiring was needed. Tested for proper operation
- Carefully centered and leveled new switch in hole and screwed it into place
- Snapped cover/bezel onto switch
Attached are a few photos of this modification.
Jim


Key Largo Repair - Crimp PEX Ring on Water Line to Resolve Water Leak
I had a water leak when I first rotated my Water Heater Bypass Valve from Bypass to Normal. Water was coming out of the underbelly area near the steps.
I didn't know exactly where the leak source was, but it was pretty easy to find. When I see water leaking from the bottom of the coach or inside the storage bay, I start with the easiest area to check - behind the utility wall or bulkhead.
In the Landmark and likely the Big Horn, Big Country and maybe other Heartland brands, 1/2 of this wall is easily removable. In this case, I removed 4 white screws from inside the left rear corner of the UDC. These 4 screws, screw into the end of the carpeted removable wall section. Then there were 2 black screws in the wall on the left end, inside the storage bay. Viola - wall comes right out.
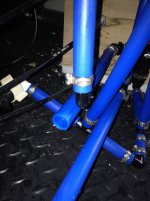
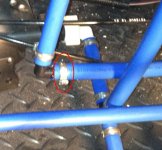
Once I got in there, I immediately saw where the leak was likely coming from. A blue PEX line had become detached from a 90 degree elbow fitting. Upon closer examination into why this would happen, I noticed an uncrimped PEX crimp ring slide over the PEX line. Oops!
For years now, I've been meaning to buy a PEX crimp tool. Now I had real and pressing reason to do so. Off to Lowes and back home with a PEX crimp tool, PEX crimp ring cutting tool (just in case) and a bag of 10 ea 1/2" PEX crimp rings (just in case).
Back at the RV, I placed the PEX line onto the elbow, slid the PEX crimp ring to within about a 1/4" of the end of the pipe and crimped it in place.
Applied full water pressure to the system and no leaks were detected. WooHoo!
I also want to make a note here that while this coach has not been defect free, behind the utility wall of this coach is by far, the most cleanest and neatest of all 5 Landmarks I have had. All wires were neatly bundled and several insulated wiring rings were in use. So wiring management has really improved. I noted too, only a single piece of white vinyl hose being used. I believe this was from the black tank flush port. In my opinion, PEX is better than vinyl. The down side is that it is noisier. It was in use on the input and output of the pump. I will be adding pipe insulation to much of this PEX, especially in and out of the water pump to quiet the chatter when it runs.
Jim


Key Largo Coax Identification and Connector Inspection/Repair
I had the factory add a Winegard Trav'ler automatic satellite dish for Direct TV on my coach during the build. I specified the 4 coax cables come from the dish to wall plates in the UDC. I also specified 2 satellite cables be placed in the entertainment cabinet, back to the UDC and 1 cable in the bedroom closet, back to the UDC.
I moved my satellite receivers from the old coach, into the new Key Largo. Now I needed to determine where to connect them and then in the UDC, where to connect my jumpers to pass the satellite signals to the right locations.
Using a cable toner, I placed a warble tone on each wall plate in the entertainment cabinet and bedroom closet, one at a time. Then one at a time, using the near field probe (receiver), I touched it to the F81 (female spilce connector) on each wall plate in the UDC until I picked up the tone. At each match, I marked the wall plates, temporarily, with ink pen on blue masking tape.
I also decided to pull down part of the coruplast underbelly material below the entertainment slide to access the coax splices that are there. This is where the wiring harness of the slide are mated to the harness in the coach frame. I marked each line there too.
I also decided to pull all wall plates off the walls, in the cabinet, closet and UDC. I then removed each connector from the back of the F81 and inspected it. I found a few that were not crafted to my liking, so I elected to replace them all with nice compression connectors. I also used marker ties and labeled the ends of the lines behind the wall plates too - just in case I ever want to make changes.
Because I needed to add jumpers in the UDC from the satellite dish outputs, to the lines going to the receivers, I decided to move a few cables around from wall plate to wall plate. So now, each feed from the dish connects to its own wall plate. All the wall plates in the UDC are double. So the other F81 in each satellite feed wall plate has a feed to a satellite receiver connected to the 2nd F81. Hence, short jumpers and no wires to manage.
This setup worked out perfectly. Dish found the satellite fast and I had signal to all tuners in all receivers - on the first attempt.
Now - if I can just get the RV receivers to work in the RV garage connected to the home satellite system! Home uses SWM technology and RV used B-band converters. Still stumped on this "for now"
Jim
Key Largo Baggage Door Strike Plate Adjustment
I noticed from day 1, the forward most of the 2 slam latches on my door side baggage door, would not latch. So the corner of the door was stuck out a 1/4" or so.
Upon close examination, it looks like that slam latch was installed ever so slightly different in the door, such that the latch bolt was slightly closer to the outer skin of the door. This meant that the strike plate not capturing the latch bolt.
I first loosened the 2 tiny screws that hold the strike plate to the bottom door frame so I could slide the plate outward slightly. The screws were all the way to the back of the screw slot, so the strike plate could not be slide outward.
I removed the screws, moved the strike plate slightly further outward and put the screws back in, but in new positions that allowed for some adjustment.
Viloa! Slam latch now latches (both sides) when slammed shut
Jim
Key Largo Entrance Door Latching Adjustment
From day one, my entrance door latch was very hard to open. In fact, Nancy thought the door was locked. Nope - just hard to unlatch.
Since the latch bolt on the door does not appear to be adjustable, I focused on the strike plate on the door frame. I first tried to move the strike plate outward. No better
I then noticed that the strike plate is rotatable. The distance from the edge of the strike plate to the hole opening in the center is different when measured front to opening versus back to opening. So I rotated the strike plate 180 degrees. Success! Or, much better. I still may need to fine tune the strike plate adjustment a bit but I think the rotation is a good first step.
Jim
Key Largo Modification - License Plate Attachment
Seems silly to call this a modification, but it sort of is. The Landmark rear cap has a beautiful recess for a license plate, yet I have never really cared for the supplied license plate bracket/light.
On the last couple of coaches, I had removed the supplied bracket/light and added 2 round license plate lights, one on each side, then two well nuts and stainless fasteners for plate attachment.
This time, at my request, the factory left off the standard bracket/light and added instead, the 2 round lights that I normally would have purchased and installed. So all I had to do this time was layout where I wanted the plate to be, drill the holes, install the well nuts, add the plate and fasten it on.
Tools Used:
Supplies Used:
Jim
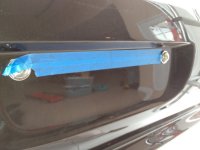
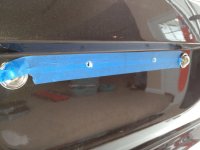
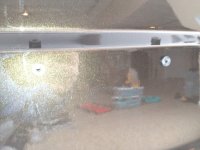
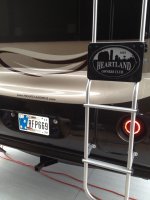
Seems silly to call this a modification, but it sort of is. The Landmark rear cap has a beautiful recess for a license plate, yet I have never really cared for the supplied license plate bracket/light.
On the last couple of coaches, I had removed the supplied bracket/light and added 2 round license plate lights, one on each side, then two well nuts and stainless fasteners for plate attachment.
This time, at my request, the factory left off the standard bracket/light and added instead, the 2 round lights that I normally would have purchased and installed. So all I had to do this time was layout where I wanted the plate to be, drill the holes, install the well nuts, add the plate and fasten it on.
Tools Used:
- Masking Tape, Pen and Straight Edge
- Drill
- 3/8" Drill bit for 10-24 well nut
- Screwdriver
Supplies Used:
- 2 ea 10-24 well nuts
- 2 ea 10-24 x 3/4" stainless steel screws (round head)
- 2 each 10-24 stainless steel flat washers
- 2 each 10-24 stainless steel lock washers
Jim


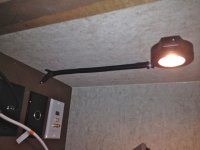
Key Largo Modification - Light Addition to Entertainment Cabinet
Seems like I'm always messing around with wiring inside the entertainment cabinet, trying this and that, adding this and that.
Well, it's usually pretty dark in these cabinets if you're trying to read the names of inputs, outputs etc.
So - I had on hand, a 12 volt RV puck light. I added it to the center of the ceiling in the entertainment cabinet. I grabbed power from a DC receptacle in the wall in the entertainment cabinet. I placed the wiring in split loom to make it look a little nicer.
Jim

Ray LeTourneau
Senior Member - Past Moderator
Great stuff Jim. I can't wait to see it in Seffner. Stay busy!!
CliffP
Well-known member
Nice mods Jim! I'd like to add a couple of outlets and I'm curious how hard it would be if I had to wires in a wall. Did you have to run any wires in the wall when you relocated your light switches. Do you know if anyone makes a DC three-way light switches?
Thanks,
Cliff
Thanks,
Cliff
Cliff,
I found this online store as a resource for some switches last night. Here's a link to one of several triple switches.
I did not have to run any wiring to do my switch relocation as the new location is no more than 1 foot from the old location and there was enough slack in the line to move the wires over.
For the puck light in my entertainment cabinet, I did have to run wiring but it was pretty simple stuff. Since I had a DC receptacle close, I pulled it off the wall, then pulled the two AC receptacles below it, off the wall too. I pulled the AC recepts so I could get access to the DC wiring that fed up to the DC recept above them.
I pulled that DC wiring out one of the holes for the AC recept. I cut off the spade terminals and then crimped on some decent butt splices. On the other end of each of the two butt splices, I crimped on 2 wires each. One set of wires was made shorter than the other. On the shorter wire, I crimped on female spade terminals, route that wire back out the DC recep hole and connected them to the terminals on the DC recept.
The other set of wires on the butt splices was left longer. These were routed up the inside of the wall to the top and out a small hole I made with a screw driver. Then out that hole and exposed across the ceiling to the new puck light. Then I placed the exposed wiring into small black split loom to dress it up a bit.
I go into this detail for you to give you confidence that DC wiring is pretty simple stuff. Some knowledge of how RVs are put together is also a plus.
Regarding your question on how hard it would be to add some a couple of outlets, I assume you mean AC receptacles. This is going to be harder than running lines for DC items (lights, switches, outlets etc.) - but very doable. Each situation is going to be different and one would need intimate knowledge of your North Trail to be able to give you any detailed advice or direction via the forum. What I suggest you do is to start your own thread in the North Trail section of this forum, showing a picture of the area you want to add an outlet and ask for ideas on wire routing. Someone out there will be familiar with your floor plan and will had ideas for you.
Note that RV AC outlets are way different than home version of AC outlets. RV outlets, generally (at Heartland at least) accept Romex type wiring in the back of the outlet, then a plastic back goes over the wire and a high leverage compression tool is used to press the back on. Prongs pierce the jacket of the Romex to make the connections. Point being, NOT FUN to work with. If it were me, first, I would use a standard residential style outlet for anything new I add, then, if I was tapping into an existing AC circuit at another existing outlet, I would change that outlet out to a residential style outlet and use a residential style "remodel (old work), plastic outlet box.
Best of luck to you.
Jim
stevebotts
Active Member
Thank you for this. Please keep them coming. We are headed to Great Lakes RV in April to pick up our new Big Horn 3685. We really would like light switches on the outside too. My husband will use your step by step instructions for sure. Any problems we will PM you in April.
Thank you for this. Please keep them coming. We are headed to Great Lakes RV in April to pick up our new Big Horn 3685. We really would like light switches on the outside too. My husband will use your step by step instructions for sure. Any problems we will PM you in April.
Happy to be an inspiration to you. Sorry but I may not be able to help you with problems you may encounter in doing your own mods. Bear in mind, the mods I am doing are not done at the factory by factory personnel. They're being done by me, regular guy, in my driveway with materials on-hand or materials I was able to gather.
That said, I will try my best to be helpful.
Jim
TomMar
Retired Texas-South Chapter Leader
Re: Key Largo Baggage Door Strike Plate Adjustment
Nice mods Jim. I noticed something else in the photos for your lights on the license plates - a trailer hitch ! ! ! Can we get one of those from the factory to install on our 2012 KL?? I am assuming it is more than a bike rack.


Nice mods Jim. I noticed something else in the photos for your lights on the license plates - a trailer hitch ! ! ! Can we get one of those from the factory to install on our 2012 KL?? I am assuming it is more than a bike rack.
Re: Key Largo Baggage Door Strike Plate Adjustment
Tom,
Look on your KL to see if you have a bracket welded onto each side of your frame, right at the end. If you do, then you can order the receiver through Heartland. Bear in mind, it's 1-1/4" only. So you know, I do not plan to use it. I'd had my share of problems with rear bike racks on several coaches to steer me clear. Now, if I had a 2" receiver, maybe I'd have better luck.
That said, if I were you, I'd consider having a competent welding shop engineer, fabricate and install a nice and beefy 2" receiver hitch for you. Then you can use a high quality bike rack that requires a 2" receiver.
Jim
Nice mods Jim. I noticed something else in the photos for your lights on the license plates - a trailer hitch ! ! ! Can we get one of those from the factory to install on our 2012 KL?? I am assuming it is more than a bike rack.

Tom,
Look on your KL to see if you have a bracket welded onto each side of your frame, right at the end. If you do, then you can order the receiver through Heartland. Bear in mind, it's 1-1/4" only. So you know, I do not plan to use it. I'd had my share of problems with rear bike racks on several coaches to steer me clear. Now, if I had a 2" receiver, maybe I'd have better luck.
That said, if I were you, I'd consider having a competent welding shop engineer, fabricate and install a nice and beefy 2" receiver hitch for you. Then you can use a high quality bike rack that requires a 2" receiver.
Jim
Re: Key Largo Baggage Door Strike Plate Adjustment
Now who's being funny Duane? I have no training and no fear. Dangerous combination. Sometimes it works out, sometimes not
Just a "regular guy"
Now who's being funny Duane?
Ray LeTourneau
Senior Member - Past Moderator
Re: Key Largo Baggage Door Strike Plate Adjustment

Yeah, I was thinking that too.Just a "regular guy"
Last edited:
porthole
Retired
Re: Key Largo Baggage Door Strike Plate Adjustment
Yeah, we have some guys at work that claim that.............................................
All kidding aside. Many of the changes that Jim and many of us have done are not really all that difficult. Sometimes you just have to give it a try.
Our #2 son the pharmacist (PharmD) had no mechanical skills that I knew of and never showed an interest in the hands on work.
But, he bought a motorcycle and has added exhaust, intakes, shocks etc, tuning kits and done some wiring, all without my help or even telling me what he was doing until he showed up with the finished task.
Most of us that RV probably have some of the skills needed to do some mods, just need to go ahead and give it a shot. Of course, I would still recommend you search the forum to see what others have accomplished.
no training and no fear. Dangerous combination. Sometimes it works out, sometimes not
Yeah, we have some guys at work that claim that.............................................
All kidding aside. Many of the changes that Jim and many of us have done are not really all that difficult. Sometimes you just have to give it a try.
Our #2 son the pharmacist (PharmD) had no mechanical skills that I knew of and never showed an interest in the hands on work.
But, he bought a motorcycle and has added exhaust, intakes, shocks etc, tuning kits and done some wiring, all without my help or even telling me what he was doing until he showed up with the finished task.
Most of us that RV probably have some of the skills needed to do some mods, just need to go ahead and give it a shot. Of course, I would still recommend you search the forum to see what others have accomplished.
Similar threads
- Replies
- 1
- Views
- 1K
- Replies
- 1
- Views
- 772
