You are using an out of date browser. It may not display this or other websites correctly.
You should upgrade or use an alternative browser.
You should upgrade or use an alternative browser.
Anyone have an Onan Generator in their Landmark 365?
- Thread starter TikiDawg
- Start date
danemayer
Well-known member
Hi Steve,
Here's a link to the folder with Onan Manuals, including an Installation Manual that might be helpful.
I think there's at least one or two owners who have gone before you - although probably not on a LM365. But I don't think they posted detailed information or pictures from their install.
So if you do this, we'll all be expecting you to post the details and the pictures.
JBoyerinAbq
Active Member
A BIG thank you Tiki for documenting the effort. We too plan to add the 5500lp unit once we finally get our Newport back from repair and appreciate those willing to write-up their experiences!
Jesstruckn/Jesstalkn
Well-known member
Steve I do have the Onan 5500 in my LM 365 Ashland. I did have it installed at the dealer before delivery. But it looks like a piece of cake. They isolated my propane tanks, 1 for the coach and 1 for the Generator. They gave me a lame reason for it but have found many others on here that have both tanks connected. It is on my to-do list to stream line it and put it back together some day soon. Stop by and check it out anytime.
Jesstruckn/Jesstalkn
Well-known member
Any time
Jerrod
Sent from my XT1254 using Tapatalk
Jerrod
Sent from my XT1254 using Tapatalk
wino2
Well-known member
We just purchased a LM365 Newport. I am in the process of ordering a Onan Genset 5500 for it.
The questions they are asking me, I can't figure out, maybe you fellow forum members could assist.
1) Air discharge kit -side or rear
2) Lenght of tail pipe
3) Supplies needed to run propane line from tanks to unit.
This is is the first installed generator that we are installing. Tired of carrying them in bed of the truck.
Any advice or answers on this would greatly appreciated.
Jesstruckn/Jesstalkn
Well-known member
I thinks Tikidawg is installing his this weekend so he should have lot's more info by Monday of what you need. 1 thing I suggest is if you have 3 A/C units make sure you get the one with 2 30amp breakers not the 20amp & 30amp.
Also on mine they installed a 8' gas line all coiled up. I just picked up a 48" line to install I'm don't know if it is the right length yet. Sorry for not having firm info for you.
Sent from my XT1254 using Tapatalk
Also on mine they installed a 8' gas line all coiled up. I just picked up a 48" line to install I'm don't know if it is the right length yet. Sorry for not having firm info for you.
Sent from my XT1254 using Tapatalk
TikiDawg
Well-known member
Re: Anyone have an Onan Generator in their Landmark 365? - Updated with Install Process
On Saturday 5/14, I started the Installation of a Cummins Onan 5500 LP Generator in our 2016 Landmark 365 - Key West.
This Post will be divided into to multiple parts because I'm not sure how many pictures I can attach to one post.
I'm sure there are lots of ways to get this project done. These are the step I took.
Part 1 (in multiple posts) will be the physical installation and electrical connections.
Part 2 (in multiple posts) will be the fuel line connections (parts did not arrive in time).
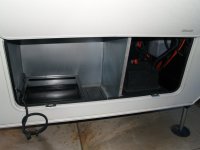
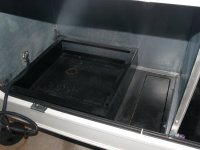
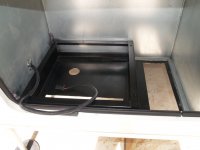
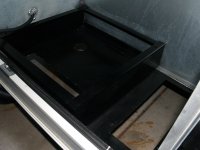
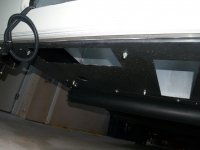
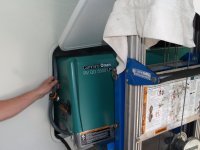
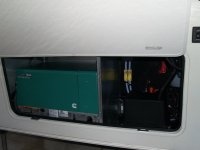
Our Key West came with the Generator Prep Package [Pictures 1 thru 5]
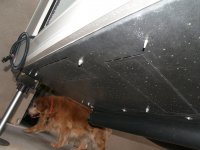
Step #1 - Cut out the Vent Holes with a saws all or die grinder [Pictures 6,7, and 8]
On Saturday 5/14, I started the Installation of a Cummins Onan 5500 LP Generator in our 2016 Landmark 365 - Key West.
This Post will be divided into to multiple parts because I'm not sure how many pictures I can attach to one post.
I'm sure there are lots of ways to get this project done. These are the step I took.
Part 1 (in multiple posts) will be the physical installation and electrical connections.
Part 2 (in multiple posts) will be the fuel line connections (parts did not arrive in time).
Our Key West came with the Generator Prep Package [Pictures 1 thru 5]
Step #1 - Cut out the Vent Holes with a saws all or die grinder [Pictures 6,7, and 8]
Attachments
-
 1_Gen Prep Package Front.jpg112.7 KB · Views: 164
 -
 2_Gen Prep Package Top.jpg121.4 KB · Views: 158
 -
 3_Gen Prep Package Bottom.jpg151.7 KB · Views: 162
 -
 4_Gen Prep Package Circuit Box.jpg117.7 KB · Views: 154
 -
 5_Gen Prep Package Battery Compartment.jpg123 KB · Views: 160
 -
 8_Holes Cut Out Top.jpg96.9 KB · Views: 153
 -
 9_Holes Cut Out Side.jpg111.4 KB · Views: 152
 -
 91_Holes Cut Out Bottom.jpg96.7 KB · Views: 146
TikiDawg
Well-known member
Re: Anyone have an Onan Generator in their Landmark 365? - Updated with Install Process
Step #2 - Rented a Genie Lift from a local rental company
Step #3 - Installed Flexible 1/2" Conduit to Generator
Step #4 - Cut a holes for Flex Conduit, Fuel Line, and Battery Cables using a 1-1/2" Hole Saw and 1" Rubber Grommets
Step #2 - Rented a Genie Lift from a local rental company
Step #3 - Installed Flexible 1/2" Conduit to Generator
Step #4 - Cut a holes for Flex Conduit, Fuel Line, and Battery Cables using a 1-1/2" Hole Saw and 1" Rubber Grommets
Attachments
-
 92_Gen Connection Side.jpg123.6 KB · Views: 162
 -
 94_Flexible Conduit Installed.jpg106 KB · Views: 158
 -
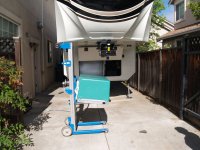 93_Genie Lift.jpg167.4 KB · Views: 162
 -
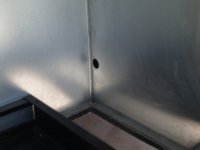 95_Hole Cut for Flex Conduit Gen Side.jpg56.4 KB · Views: 152
 -
 96_Hole Cut for Flex Conduit Bat Side.jpg114.5 KB · Views: 156
 -
 961_Hole Cut for Fuel Line.jpg70.6 KB · Views: 156
Jesstruckn/Jesstalkn
Well-known member
Awesome job Steve. check that one off your long list.
Sent from my XT1254 using Tapatalk
Sent from my XT1254 using Tapatalk
TikiDawg
Well-known member
Re: Anyone have an Onan Generator in their Landmark 365? - Updated with Install Process
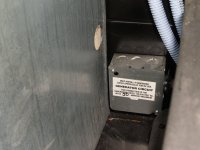
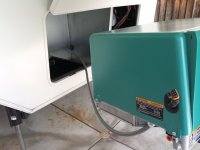
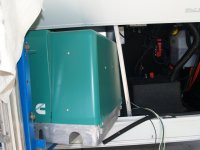
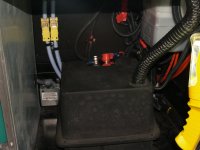
Step #5 - For Some reason the bolts holes in the bottom of the Generator were not tapped and the bolts they provided were not self tapping. Had to Tap the 4 holes with a 3/8 x 16 Tap.
Step #6 - Rolled Genie Lift closer to Coach and fed Flexible Conduit through the hole to battery compartment.
Step #7 - Had DW hold/guide Flexible Conduit as I pushed Genie Lift into position.
Step #8 - Unscrew Generator Sheet Metal Box at Battery Side Bottom (1 screw) and push toward battery to make extra clearance.
Step #9 - Push Generator into place.
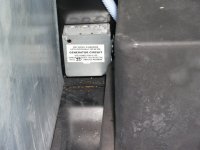
Step #10 - Plug in GenSet Connector.
Step #5 - For Some reason the bolts holes in the bottom of the Generator were not tapped and the bolts they provided were not self tapping. Had to Tap the 4 holes with a 3/8 x 16 Tap.
Step #6 - Rolled Genie Lift closer to Coach and fed Flexible Conduit through the hole to battery compartment.
Step #7 - Had DW hold/guide Flexible Conduit as I pushed Genie Lift into position.
Step #8 - Unscrew Generator Sheet Metal Box at Battery Side Bottom (1 screw) and push toward battery to make extra clearance.
Step #9 - Push Generator into place.
Step #10 - Plug in GenSet Connector.
Attachments
-
 97_Bottom of Gen Not Tapped 3-8 x 16.jpg158.3 KB · Views: 166
 -
 98_Flex Conduit through Hole.jpg96 KB · Views: 158
 -
 981_Flex Conduit Bat Side.jpg89.1 KB · Views: 149
 -
 982_Flex Conduit Guide.jpg132.1 KB · Views: 150
 -
 983_Unscrew Gen Box Sheet Metal.jpg109.9 KB · Views: 150
 -
 984_Plug for GenSet Connector.jpg98 KB · Views: 149
 -
 985_Plug In GenSet Connector.jpg76.2 KB · Views: 150
TikiDawg
Well-known member
Re: Anyone have an Onan Generator in their Landmark 365? - Updated with Install Process
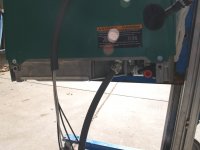
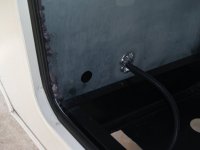
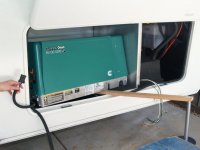
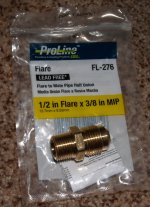
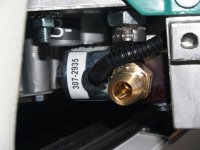
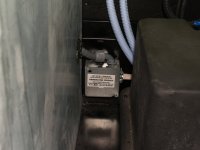
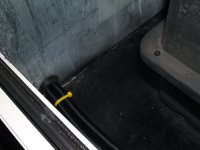
Step #11 - I decided to go with a 1/2" Steel braided Fuel Line from the 2 stage Pressure Regulator to the Generator. (Perhaps a little over kill, but that's just me.) Picture of fitting used at Generator connection.
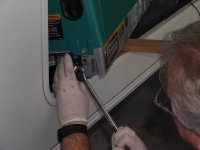
Step #12 - Installed the Fuel Line Fitting before bolting down the Generator
*** I had to back track here while dong the fuel line install. I had to lift the Generator back out of the hole and install the fuel line to the fitting and then feed the hose up into the fuel tank compartment. There just wasn't enough room to get my hands in between the firewall and generator to connect the line to the fitting with the Generator bolted down. This may have been easier with 3/8" fuel line. Wrestling the 1/2" steel braided line was extremely difficult.
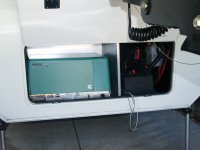
Step #13 - Installed the 4 (3/8" x 16) bolts rom the bottom up. (lots of fun here!)
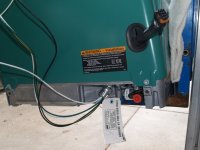
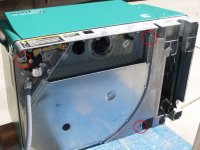
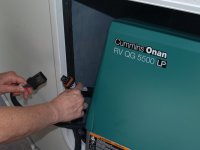
Step #14 - Joined the wires in the Circuit Box. 2 Whites to White, Black to Black, Black with Yellow Stripe to Red, Green to Ground.
Step #15 - Closed up the Circuit Box. (Note: Hole in firewall could have been a little lower)
Step #11 - I decided to go with a 1/2" Steel braided Fuel Line from the 2 stage Pressure Regulator to the Generator. (Perhaps a little over kill, but that's just me.) Picture of fitting used at Generator connection.
Step #12 - Installed the Fuel Line Fitting before bolting down the Generator
*** I had to back track here while dong the fuel line install. I had to lift the Generator back out of the hole and install the fuel line to the fitting and then feed the hose up into the fuel tank compartment. There just wasn't enough room to get my hands in between the firewall and generator to connect the line to the fitting with the Generator bolted down. This may have been easier with 3/8" fuel line. Wrestling the 1/2" steel braided line was extremely difficult.
Step #13 - Installed the 4 (3/8" x 16) bolts rom the bottom up. (lots of fun here!)
Step #14 - Joined the wires in the Circuit Box. 2 Whites to White, Black to Black, Black with Yellow Stripe to Red, Green to Ground.
Step #15 - Closed up the Circuit Box. (Note: Hole in firewall could have been a little lower)
Attachments
-
 986_Fuel Line Part at Gen.jpg151.1 KB · Views: 155
 -
 987_Install Fuel Line Connection 1.jpg97.6 KB · Views: 147
 -
 988_Fuel Line Connection Installed.jpg110.3 KB · Views: 140
 -
 989_Generator in Place - Bolts In.jpg100.8 KB · Views: 144
 -
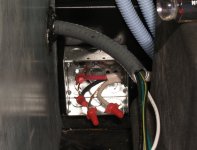 99_Inside Circuit Box.jpg116.2 KB · Views: 148
 -
 991_Circuit Box Wired Up.jpg91.4 KB · Views: 144
Last edited:
TikiDawg
Well-known member
Re: Anyone have an Onan Generator in their Landmark 365? - Updated with Install Process
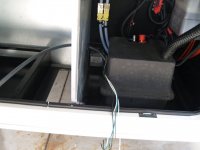
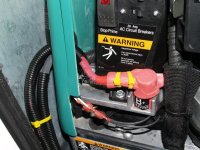
Step #16 - Battery Cable Installation from Generator to Battery.
Step #17 - Connect Positive Cable to Battery First, then Negative Cable Second.
Generator Physical and Electrical Installation is Complete.
Except for exhaust. I need to have the exhaust pipe "extended" another 22". I will provide pictures when it come back from the muffler shop.
Fuel Delivery System Installation coming soon (as soon as the parts arrive)
Attachments
jdamude
Well-known member
Re: Anyone have an Onan Generator in their Landmark 365? - Updated with Install Process
Thanks for the step by step installation. I'm doing the same instalation in our Big Country 4010RD. I'm interested in finding out how you routed the fuel line and also if you can tell me what size grommets you used and where you sourced them?
Our trail did not have the prep package. I purchased everything from Heartland to do the install. We had to take the fire box apart to get it in a reassemble it in the coach. Worked out good. I'm leaving the right side off until we slide the generator in.
Thanks
Jeff
Step #16 - Battery Cable Installation from Generator to Battery.
Step #17 - Connect Positive Cable to Battery First, then Negative Cable Second.
Generator Physical and Electrical Installation is Complete.
Except for exhaust. I need to have the exhaust pipe "extended" another 22". I will provide pictures when it come back from the muffler shop.
Fuel Delivery System Installation coming soon (as soon as the parts arrive)
Thanks for the step by step installation. I'm doing the same instalation in our Big Country 4010RD. I'm interested in finding out how you routed the fuel line and also if you can tell me what size grommets you used and where you sourced them?
Our trail did not have the prep package. I purchased everything from Heartland to do the install. We had to take the fire box apart to get it in a reassemble it in the coach. Worked out good. I'm leaving the right side off until we slide the generator in.
Thanks
Jeff
Jesstruckn/Jesstalkn
Well-known member
What's the deal Steve, do you have Kelly taking pictures for you ? Your gonna make me have to step up my game and get Rhonda out here doing my photography.
Real nice step by step. your giving Jim B. a run for his money.
Let's do some boon-docking buddy.
Real nice step by step. your giving Jim B. a run for his money.
Let's do some boon-docking buddy.
Similar threads
- Replies
- 11
- Views
- 4K
- Replies
- 4
- Views
- 2K
- Replies
- 52
- Views
- 16K
- Replies
- 1
- Views
- 1K