jbeletti's 2015 Landmark 365 Ashland

Rcnewell11

Active Member
Ho Rob - sorry to hear you had slide issues. So that I may learn to recognize the signs, how did you know you had an issue? I'm guessing it was louder and maybe jerky?

I was getting the rooms running uneven on one end from the other sliding out or in.I was hearing popping and griding noises when moving slides in and out.i call HL service department and they sent me link on how to fix jumping gears situation on tubes.there was a link on lipperts site to fix it real easy.Don sent link from HL service and new gear and resembled and timed slide out and adjusted and good to go now and quiet.thanks heartland on info


Sent from my iPad using Tapatalk
 

jbeletti

Well-known member
Looks to be a good factory option to me - have the flush king installed on the build.

Cutting that pipe flush and trying to get the inner piece out, I just don't think that will work.

But, it looks like you have enough pipe that you could just cut the sweep out and put a new one in with a pair of pipe connectors. That's about what I did on the Cyclone.

Duane - you gotting me thinking that I am over thinking this :)

Looks like the straight section of 3" pipe, after the last 90 and before the Camlock adapter I added, has enough length in it that I can cut a 3" Gate Valve (slip x slip) in there. I could probably even remove an inch of pipe length and have the entire project be no longer than I started at. By the way, I added some Material Source links to my post (#17).
 

murry135

New York Chapter Leaders - retired
JB have you noticed if your coach was lowered during MorRyde install? Mine was by 2" resulting in issues at some campgrounds with drainage. Looking for fix only see mascerator with pump as a fix.
 

jbeletti

Well-known member
JB have you noticed if your coach was lowered during MorRyde install? Mine was by 2" resulting in issues at some campgrounds with drainage. Looking for fix only see mascerator with pump as a fix.

Jim - yes, mine was lowered by about 2". This is what I wanted/needed in order to get into my RV garage (7 degree slope on the driveway).

I "think" I'm okay on the sewer but I'm concerned about my generator exhaust pipe. It's lower than the sewer outlet. But that's way easier to raise :)

Not sure how a macerator would help you if your sewer outlet is too low and you fear it scraping the road/ground in some approaches.
 

wdk450

Well-known member
Re: My Mods: Added Wastemaster Waste Management System

Some readers my know that I've been using a certain brand/style of sewer hose for a number of years now (since 2008 actually). Doug Swarts invented the Wastemaster Waste Management System many years back. Recently, Lippert purchased from Doug, the Wastemaster product and patents and is now having them produced for them. Link to product page.

I had a chance to tour Lippert's enormous After Market Products facility in South Bend recently, where I picked up the current Wastemaster system. I installed it this morning. I've installed these before, so it only took me about 10 minutes.

Tools/Supplies I Used
  • Wastemaster Waste Management System from Lippert
  • Hack Saw
  • Emory or Sand Cloth
  • ABS or Multi-Purpose Cement
Steps I took
  1. Remove sewer cap from coach as well as the short rubber tether
  2. Using Hack Saw, cut off all 4 barbs for the Bayonet fitting on the sewer outlet
  3. Using Emory or Sand Cloth, sand down any protrusions where you cut off the barbs, then sand around the entire outside of the sewer outlet (about a 1" wide band from the end). Clean dust off sanded area
  4. Add cement to the exterior of the last 1" of the sewer outlet. I added cement to the inside of the CamLock adapter too
  5. Push the CamLock adapter fully onto the sewer outlet in about a 90 degree off position, the carefully twist the adapter into the final position to the Locking Handles are horizontal
That's it. Allow cement time to dry, connect Wastemaster hose to sewer outlet, lock Locking Handles, open valve at the end of the 90 degree Nozzle, walk the sewer hose to the sewer connection at the campground and push the Nozzle/Tapered Rubber Donut into place.

View attachment 35081 View attachment 35082 View attachment 35083 View attachment 35084 View attachment 35085 View attachment 35086 View attachment 35087 View attachment 35088 View attachment 35089 View attachment 35090 View attachment 35091

Jim:
Does the rubber doughnut make an airtite seal with the RV park sewer fitting? This is required by code in many jurisdictions (i.e. the screw-on adapter instead of just the tapered smooth end adapter). Is the doughnut somehow secured to the RV parks sewer fitting? I would hate to think what would happen with high sewer hose pressurized flow if it blew loose from the park sewer fitting. BTW, if I am worried about this when dumping, I put the weight of my big sewer hose storage container on top of the hose end connection to the park sewer connector on the ground.
 

murry135

New York Chapter Leaders - retired
JB,

My issue really is pumping up hill, as you know poop does not flow up hill only down hill, LOL. I thought a mascerator pump would take care of uphill drains by pumping it up.

Murry
 

jbeletti

Well-known member
JB,

My issue really is pumping up hill, as you know poop does not flow up hill only down hill, LOL. I thought a mascerator pump would take care of uphill drains by pumping it up.

Murry

Okay - I see now. You're saying if the campground sewer connection us higher than the sewer outlet of your RV - no flowage. I could see this in a few case but guessing it will be a minority. I will find out soon enough though :)
 

jbeletti

Well-known member
Re: My Mods: Added Wastemaster Waste Management System

Jim:
Does the rubber doughnut make an airtite seal with the RV park sewer fitting? This is required by code in many jurisdictions (i.e. the screw-on adapter instead of just the tapered smooth end adapter). Is the doughnut somehow secured to the RV parks sewer fitting? I would hate to think what would happen with high sewer hose pressurized flow if it blew loose from the park sewer fitting. BTW, if I am worried about this when dumping, I put the weight of my big sewer hose storage container on top of the hose end connection to the park sewer connector on the ground.

Bill - the nozzle is ribbed. So the donut pushes on. Not tightly, but it does hold it. Then, the donut is tapered, so you can press it into the campground sewer connection to make the seal. It's not very compressible but I've had no issue with it in 7 years. I hear you on the weight. I've used a rock before as in CGs that have a real narrow sewer pipe where I could not use the donut and was not comfortable dumping without some down pressure.
 
Last edited:

wdk450

Well-known member
Jim
Looks good and cam locks do provide a secure seal but how do you plan to handle any tank valve leakage? I have a tiny bit and added the additional valve on the outlet so I don't have any surprises when I uncap.


Sent from my iPhone using Tapatalk

I don't have the camlock system (yet), but have had a little problem with sewer valves leakage and hard to actuate. First of all, I have a small collection of the personal washbasins the hospitals give you when you are their guest. I keep them in my sewer hose storage container, have added a length of mechanics wire to them, and place them under the sewer pipe outlet before removing the cap. I leave them there until I finally leave and pack up the sewer hose stuff. They catch anything under the cap when it is removed, and any possible leaking between the pipe/hose connection while dumping. I use the mechanics wire to secure them from the wind during my stay.

I think I have pretty much cured my valve leakage/hard actuation by using the Camco Drain Valve Lube with Coconut oil. After draining the tanks, I close the valves, put a couple of ounces of the product down the affected drain, run 3-5 gallons of water into that drain, go outside and work the affected valve open-closed quickly about 10 times. So far I have had good results, have noticed better sealing and easier actuation. I have noticed corrosion (probably from fresh water hookup spray) on the actuator handles/shafts. So, after lubing/cleaning the valves, I try to get penetrating oil down the actuator shafts/cables.
 

travelin2

Pennsylvania Chapter Leaders-retired
Okay - I see now. You're saying if the campground sewer connection us higher than the sewer outlet of your RV - no flowage. I could see this in a few case but guessing it will be a minority. I will find out soon enough though :)

Ran into this exact situation several times last year. Fortunately we weren't at any one place long enough for it to be a significant issue. The only drawback was I had to use the dump station upon leaving.


Sent from my iPhone using Tapatalk
 

fredwrichardson

Past New Mexico Chapter Leader
Rob,

My new Ashland is at the shop right now with the same issue. It made a pop sound one day and then the slide would go all the way end on one side but the other side stuck out about an inch and would not make contact with the seal. Glad to hear they can fix it for the unit has been in the shop now for going on two weeks.

Also could you send me the links to the YouTube videos showing the fix.

Thanks,

Fred


I was getting the rooms running uneven on one end from the other sliding out or in.I was hearing popping and griding noises when moving slides in and out.i call HL service department and they sent me link on how to fix jumping gears situation on tubes.there was a link on lipperts site to fix it real easy.Don sent link from HL service and new gear and resembled and timed slide out and adjusted and good to go now and quiet.thanks heartland on info


Sent from my iPad using Tapatalk
 

porthole

Retired
If local codes require an airtight seal - then the campground should supply the appropriate connection.

When I have to use the donut, I twist it into the pipe first, snugging it up, then I put the elbow into the donut.
I found this gives me the tightest connection with the donut.
 
Last edited:

sjandbj

Well-known member
Re: My Mods: Added Wastemaster Waste Management System

Jim,
I installed the Wastemaster system on my 2015 Big Country. I was worried about leaking valves after reading all the post on this forum so I cut the extra pipe off back to the elbow and installed a 3 inch valve. After that I decided that i still wanted to see if the draining was complete so in found a piece of clear 3" PVC pipe and installed this after the gate valve then installed the cam loc fitting. at Lowes I found a strap to support the pipe so I added a little extra support to the pipe for safety. My entire set-up did not cause the pipe to extend any further than the factory install. I now have a visual indicator at the cam loc and at the main Wastemaster valve.
As far as the holder goes I could not handle the bright white that the cover came in so I painted it black and mounted it directly behind the factory tube that came for the old style sewer hose. So far this system has worked well and all of the pieces are stored outside the rig. It might be a case of over engineering something but that is half the fun of doing a project like this. If anyone is interested I can post pictures after I get the unit back from service tomorrow.

Regards,
Steve
 

jbeletti

Well-known member
Steve - I'd love to see straight on and side view pictures of your sewer outlet area if you get a chance. Love the idea of a clear section up top but never thought about clear PVC. Where did you get your clear PVC and what sort of money did they get for it. Also, does it have a slight blue tint for UV stability? Saw some online and most had a blue tint.
 

jbeletti

Well-known member
My Mods: Shortened and Raised Generator Exhaust Pipe

The generator exhaust pipe on my coach was very long and very low. The reason for the length was the desire to get the end of the pipe past the bedroom slide. The reason for the low ground clearance was likely two-fold. My coach was lowered by about 2" as a result of my MORryde Independent Suspension install (this lowering was one of my goals). The other reason was that the factory simply hung it too low in my opinion.

My primary motivation for reworking this pipe is that with a 7 degree upward slope on my driveway, the pipe scraped my concrete driveway. We tried to protect the concrete with thin paneling strips but it still got away from us a couple of times and the pipe end scraped and the u-bolt ends and the bracket bolts scraped :(

Working with Heartland and with them consulting the most current code, it turns out that my generator exhaust pipe needs to have a vertical clearance of 36" to the bottom of the bedroom slide. Also, it needs to have a horizontal clearance of 36" to the center of the LP regulator (in the LP tank cabinet). So it was installed within code but perhaps a bit overdone. Apparently, it does not need to go past the end of the bedroom slide. Mine is now at about the center. That said we do not sleep with the generator running.

I ended up moving relocating the end of the pipe to about 38" rearward of the center of the LP regulator. I ended up reworking the mounts to move the pipe about 2" higher and still have about 2" clearance to the coruplast when it makes the turn to go over to the generator.

Before - you can see the gen pipe is lower than the sewer outlet.
The sewer outlet cleared the driveway/garage floor transition by maybe an inch.
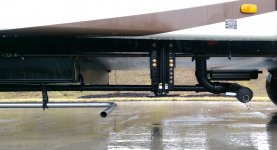
Generator Exhaust - OLD.jpg

After - Tighter to the frame and about 3 feet shorter.
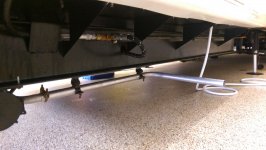
Generator Exhaust - New - 01.jpg

Here you can see down the side of the coach.
The gen pipe end sticks past the side of the j-wrap by about 2".
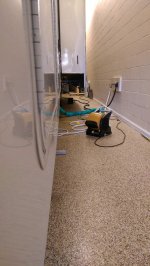
Generator Exhaust - New - 02.jpg

Looks like the pipe comes out at about the mid point of my storage door.
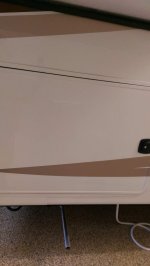
Generator Exhaust - New - 03.jpg

The Change-Over/Regulator is just to the right of center
of the LP tank. The gen pipe outlet is about 38" horizontally from the regulator.
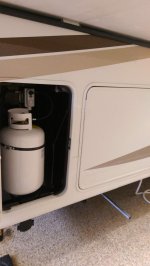
Generator Exhaust - New - 04.jpg
 

jbeletti

Well-known member
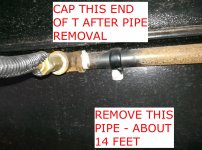
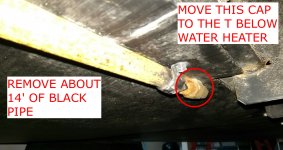
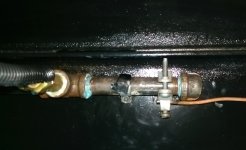
My Mods: Removed 14' of Black Pipe (for LP)

While scoping out the situation to do another mod to the coach, I found some black pipe (LP line) to be mounted to the frame "in my way". Upon contemplating this, it dawned on me that in my coach, there was no need to have black pipe running the length of the coach as I have no propane using devices in my kitchen.

I followed the pipe to the end and sure enough, it was simply capped off. I contacted Heartland to see if there was any down-side to me removing this pipe. None. I happened to catch our the plumber that plumbs all the new homes in my subdivision. He had everything I needed (short nipple, cap, pipe dope, pipe wrenches and experience) :)

Took he and I about 30 minutes to drop all the hangers, remove the ground, wrench out a couple of 90s and all the pipe, add the short nipple, cap, reground it and resecure it. I turned the gas back on and sprayed our work well with a soapy water solution - no leaks! Worked out perfect. Now I'll be going to his home to install a phone line and a fax machine. Fair trade to me, I have a lot of experience in that area.

BEFORE
IMAG2559.jpg IMAG2560.jpg

AFTER
IMAG2562.jpg
 

Nabo

Southeast Region Director-Retired
Re: My Mods: Removed 14' of Black Pipe (for LP)

Great job. Wish all of us had your luck.
 
Top