jbeletti's 2015 Landmark 365 Ashland

jbeletti

Well-known member
Kathy - from my mirror, on a rough patch, I can see IS doing it's thing. But, I still have stuff coming out of the cabinet over the sofa on patches of road that are extremely bad. Traveled 2 days with no incident. Traveled the 3rd day - just a few hours and encountered some REAL BAD spots going onto and coming off of bridges - maybe 3 of them in LA on I-10/12. The IS absorbed the shock but the engery is still in the system, so there is recoil. Bottom line is the rear of the coach can still bounce. Not as severe, but still, in some circumstances - bounce. It's this bounce that shakes the contents of the cabinet over my rear cap. That and the shelf the contents are on (an upper shelf) has nearly no lip/edge on it. I plan to add a lip this week.

Gary W and I have yet to connect by phone but I want to give him my feedback. What I am wondering is, does IS have a "settle in" period, similar to how some leaf springs packs can have.

This all said, I'm still grateful to have IS as I know it is helping and I was able to have MORryde lower my coach a bit because I needed the lowering for my garage approach. Some have mentioned their concern about getting IS as they don't want their coach lowered. The system has something like 5" of vertical travel. Depending on the RV, some RVs "can" be lowered if desired. But most installs result in a same-as-OEM ride height. If desired, a taller riser can be used to give a rig more-than-OEM clearance.

I also LOVE the Kodiak disc brakes. I thought the Dexter disc brakes I had were good but these Kodiaks seem even better.
 

Bryced15

Well-known member
Jim, what level do you tend to run your Ford IBC? I'm having some trouble getting these disc brakes "dialed in" it seems like. In a harder stop I'm getting what seems to me like surging in the trailer brakes rather than a smooth linear feel. I made sure the truck was set to electric over hydraulic and it was.
 

jbeletti

Well-known member
Jim, what level do you tend to run your Ford IBC? I'm having some trouble getting these disc brakes "dialed in" it seems like. In a harder stop I'm getting what seems to me like surging in the trailer brakes rather than a smooth linear feel. I made sure the truck was set to electric over hydraulic and it was.

I'll have to check. I think it's still on 8. Probably too high but honestly, I get great stopping without locking up the trailer brakes.
 

porthole

Retired
If you don't ask, MOR/ryde tends to build the IS sub frame so that the finished product is a level trailer to level truck.
And in most cases the overall height is increased some because the trailers frame needs to be beefed up before hanging the IS.

5" of travel is correct roughly 2.5" either way from static. And I was told there is some what of a settling in period. So the deflection my not be qual when first done.
 

kakampers

Past Heartland Ambassador
Jim...I also think there is a settling period...we had the same issue in the beginning, but now we have to hit some really rough road to have any issues. Last trip we forgot to secure the big TV...it was hanging out some on the bracket, and knocked the sound bar down, but was none the worse for wear! I think without IS it would have been on the floor and ripped from the wall.
 

jbeletti

Well-known member
My Mods: Inverter/Refer Status Light

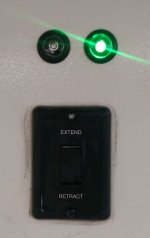
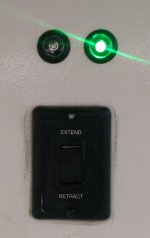
Today, I added an Inverter Status Light to the coach. It's the green LED that appears below, above my front jack switch. By extension, this is really by Refer Status Light. If the Inverter is on, my Refer "should be" on. If I look in my rearview mirror and do not see the green light, I know to stop and check things out.

Cost of this project is about $15. Less if you have the AC to DC adapter on-hand. See attached PDF for a more detailed project write-up.

The unlit light next to the green light is a Blue LED. It will be detailed in an upcoming project called Water Pump Switches and Status Light.
Inverter Status Light - Green.jpg
 

Attachments

  • RV_Project_–_Inverter_Status_Light.pdf
    247.7 KB · Views: 308
Last edited:

jbeletti

Well-known member
My Mods: Two-Stage Water Filtration System Installed

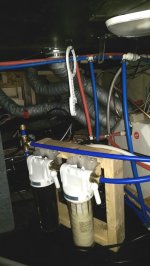
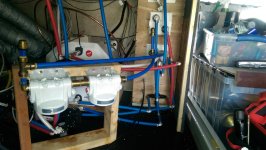
Today I installed the two-stage water filtration system I built and used in the previous coach. This system also includes a pressure gauge. While the system install was completed today, I was unable to add filters to the canisters and screw on the canisters. Seems I've lost/misplaced one of the rubber o-rings and the one I have is a bit stretched. So I have the 2 filter housing heads in "bypass" mode so they pass water from one to the other and then to the coach.

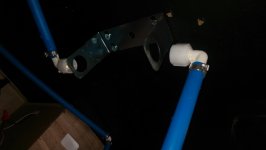
Heartland installs a single-stage whole-house filter in Landmark 365. As I have my own, I removed the one that came with the coach. Below is a picture of what it looks like. I believe it's a Culligan. It was well secured with 4 large screws to the ceiling of the basement, behind the UDC. Not seen here is that it was leaking . Not a lot, but enough to cause concern. Not sure if the housing isn't screwed on tight enough or if the leak was at one of the two fittings.
Heartland Water FIlter - Installed 1.jpg

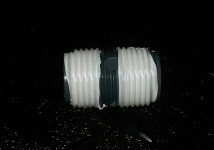
I left the bracket installed for the OEM filter so I can replace it easily when I turn in the coach in 2-years. To simplify reinstallation I simply used a 1/2" MPT x 1/2" MPT plastic union to connect what was the input and output together. Probably didn't need to use tape on the plastic union but figured it wouldn't hurt. Pressure testing revealed no leaks :)
Heartland Water FIlter - Removed 1.jpg Half Inch by Half Inch - Male Union.jpg Heartland Water FIlter - Removed and Joined.jpg

I ended up moving the water pump back about 8" in order to fit the filters behind the wall. Moving the pump was easy. I only needed to make up a longer section of PEX to reach the pump in the new location. Old location, then new location shown below.
Water Pump - Old Location.jpg Heartland Pump - Relocated 1.jpg

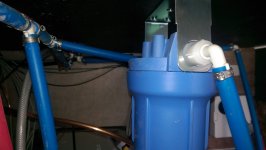
Below is a picture of the completed installation (less the canisters). I used Sharkbite brand Push-Fit fittings where possible. Fortunately, I was able to reuse all the Sharkbite fittings from the previous install - due to the reusability of these fittings. Love them! The 2nd stage is on the left. The output has a T. One leg of the T will feed my ice maker eventually. For now, it's capped off with a Sharkbite Push-Fit cap.

The pressure gauge which is mounted in the shower compartment of the UDC is not seen but you can see a line going there.
Water FIlters Installed - Filter Wrench in Place.jpg

As I'm at the LA rally in Kinder doing this work - Jay C and Andy G both assisted me in testing systems and tool handling. Thanks guys!
 

Attachments

  • 2-Stage Water Filtration System - Installed - Less Canisters.jpg
    2-Stage Water Filtration System - Installed - Less Canisters.jpg
    324.2 KB · Views: 301
Last edited:

busted2341

Well-known member
Jim, You've given us so many great ideas. I can't wait to bring up your instruction and get started...lol......What I am requesting is a wine rack...How bout showing us a wine rack? Maybe built in above the convection oven (that's where the wife suggested)...I.m handy with direction!.....lol.....Thanx for all the stuff I can add! Frank
 

jbeletti

Well-known member
Jim, You've given us so many great ideas. I can't wait to bring up your instruction and get started...lol......What I am requesting is a wine rack...How bout showing us a wine rack? Maybe built in above the convection oven (that's where the wife suggested)...I.m handy with direction!.....lol.....Thanx for all the stuff I can add! Frank

Hey Frank - I'm not a wood worker and I have no open space for a wine rack. Certain floor plans in some of our brands use a short unused spot above the microwave for wine storage. Or more like "wine display". Trouble with storing wine up there is the bounce of the road and will those bottles stay up there during travel? The other issue is heat. Heat is a killer to wine.

Sorry I couldn't help you on this one but I hope to inspire you on other projects :)
 
Last edited:

jbeletti

Well-known member
My Mods: Edge Added to Upper Shelving

As some have read, the front edge that Heartland had in some upper shelving in upper cabinets was real short. An 1/8" at most. The cabinet above my sofa in the rear cap is really tall. As such, Heartland has added a shelf all the way across it. This really helps me to more fully utilize the storage space.

The issue I was having is keeping some items up on the top shelf from falling off during travel. To solve this, from home, I brought with me a strip of finished luan that was 2-1/2" wide. It wasn't quite as long as the upper shelf but close enough.

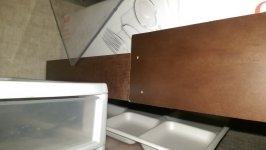
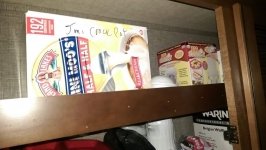
Below are two images of the completed installation of my luan strip. I used a brad nailer to fasten the strip to the existing horizontal stile in front of the shelf. I flushed it to the bottom of the stile, giving myself about a 1/2" lip at the top. Just what I needed. The first image shows where my strip was shorter than I needed. From that image, you get a sense of the lip I created.

Shelf Lip Partial.jpg Shelf Lip Full.jpg
 

porthole

Retired
Re: My Mods: Edge Added to Upper Shelving

How is the vibration from the pump without a hose loop on the output?
 

jbeletti

Well-known member
Re: My Mods: Edge Added to Upper Shelving

How is the vibration from the pump without a hose loop on the output?

Duane - I'll have to report in that later. Reason being, for this short trip, on travel days, the water pump was not getting primed. Seems I forgot to close the fresh water tank drain - oops! How I was drawing any water is surprising.
 

jbeletti

Well-known member
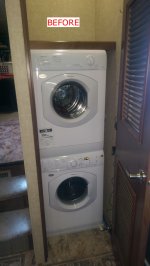
My Repairs: Hot/Cold Water Swapped on Washer and How to Remove a Stacked Dryer

Nancy complained of no cold water in the clothes wash machine. I knew what needed to be done.
  • A. Check to see if the cold water supply was on "behind the washer"
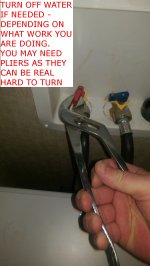
  • B. Check to see if the cold/hot were swapped - also "behind the washer"
To do either, I needed to remove the dryer as the plumbing connections are behind the washer and the closet has no access to the back.

Removing the dryer is not very difficult - but it's not for everyone either.

My issue ended up being swapped hot/cold water lines. I was able to swap them with no issue.

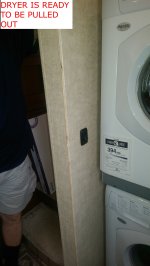
For those curious or in need of removing their stacked dryer in a closet like mine (Ashland, San Antonio - maybe other brands), here are the steps I took:
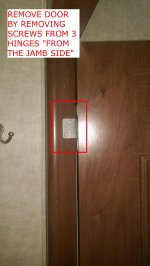
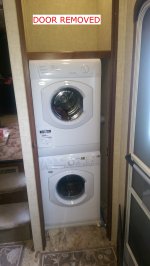
  1. Removed closet door (remove both screws from all 3 hinges from the door frame - not the door)
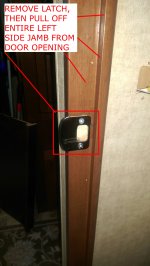
  2. Removed both screws and striker plate from latch side of door frame
  3. Removed latch side door frame (just pulled if right off the opening, then removed all brad nails)
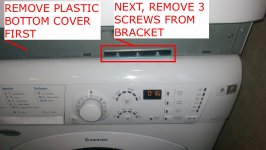
  4. Removed lower plastic panel from dryer
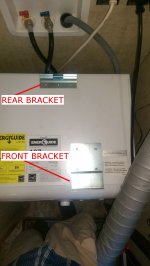
  5. Removed 3 screws from the front face of the bracket holding dryer to washer
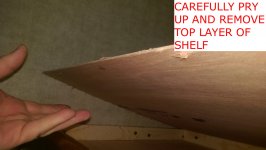
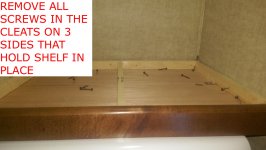
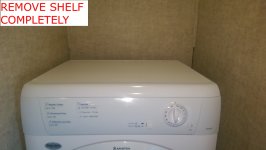
  6. Removed shelf above dryer (see details in pictures - not all W/D closets have a shelf right on top of dryer - but a 1/2" of vertical clearance is needed to remove the dryer)
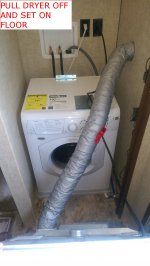
  7. Removed dryer (lifted up, then pulled forward and sat it on the floor)
Reverse above steps to reinstall.

Thank you Jeff (new guy from LA) for assisting me today :)

Pictures
Before - 01.jpg Before - 02.jpg Door Removed - 03.jpg Bottom Trimmed Removed - 04.jpg Remove Door Latch and Jamb - 05.jpg Remove Top Shelf Layer - 06.jpg Remove Shelf Screws - 07.jpg Shelf Removed - 08.jpg Dryer Ready to be Pulled - 09.jpg Dryer Pulled - 10.jpg Water Turned Off - 11.jpg Dryer Brackets - 12.jpg
 

olcoon

Well-known member
Re: My Repairs: Hot/Cold Water Swapped on Washer and How to Remove a Stacked Dryer

It's great seeing what you are doing & how you are doing it, but I'll bet it's a real pain & cuts into the time it takes you to do a project with all the good step by step photos you take!
 

jbeletti

Well-known member
Re: My Repairs: Hot/Cold Water Swapped on Washer and How to Remove a Stacked Dryer

It's great seeing what you are doing & how you are doing it, but I'll bet it's a real pain & cuts into the time it takes you to do a project with all the good step by step photos you take!

Hi Roy - hope you and Sally are well. Taking the pics is no biggie. Adding captions, writing a forum post and uploading the images is a bit of a pain. If the time I take to do this helps, inspires or otherwise gives others the confidence that they too can do some of this stuff - then it's all worth it :)
 

TravelTiger

Founding Texas-West Chapter Leaders-Retired
Yes, very helpful! But why design a closet for washer/dryer that has to be disassembled to get to the valves?!?


Sent from my iPhone using Tapatalk
 

travelin2

Pennsylvania Chapter Leaders-retired
Yes, very helpful! But why design a closet for washer/dryer that has to be disassembled to get to the valves?!?


Sent from my iPhone using Tapatalk

I've wondered the same. We don't have nor need a washer/dryer but IF I were to add one, I'd already decided that the water and drain would be relocated to the dividing closet wall for easy access even at the expense of loosing a few inches in the closet.
Same thing goes for direct access to the shower valve.
Don't build a house without access and the punishment these take bouncing down the road!


Sent from my iPhone using Tapatalk
 

kakampers

Past Heartland Ambassador
Hey Jim...sorry I missed helping you with this again...seems you do this with almost every new coach...;).

I liked where my hookups in my 2008 Bighorn were...on the right side wall in the closet...we built a shelf to lift dryer above hookups which gave us easy access. They're not too bad in our 2013 Landmark either...our W/D close this in the bedroom up front...there is in access panel in the side of the closet wall adjoining the W/D closet...we just remove clothes, unscrew panel and we can reach the valves.

Heartland needs to rethink the valves location when the closet is on the main floor....
 
Top