jbeletti's 2015 Landmark 365 Ashland

ziggy

Retired Oregon HOC
Re: My Mods: Added Remote Control Caddy

You might want to include the photos from Jim's post in your order. Mark went to order the caddies and found that parts had no idea what he was talking about until they saw photos. They are about $20 each before member discount.

Jim, you are costing me money! Mark want to do the inverter indicator light, the caddies, the two stage water filter (he already does this with an external box, but he wants it behind the wall now), and who knows what else by the time we get the coach home. He might have you help with the inverter indicator lights in WA, if that is OK with you.

Kristy
 

jbeletti

Well-known member
Re: My Mods: Added Remote Control Caddy

You might want to include the photos from Jim's post in your order. Mark went to order the caddies and found that parts had no idea what he was talking about until they saw photos. They are about $20 each before member discount.

Jim, you are costing me money! Mark want to do the inverter indicator light, the caddies, the two stage water filter (he already does this with an external box, but he wants it behind the wall now), and who knows what else by the time we get the coach home. He might have you help with the inverter indicator lights in WA, if that is OK with you.

Kristy
Hi Kristy - sorry to cost you even more money - but the Inverter Status mod and the Remote Caddies are pretty cool stuff :) If you end up finding the Heartland part number via your order, let me know and I will add it to my post.
 

jbeletti

Well-known member
My Mods: Added Reinforcement to Switch Panel Mounting

Due to my tinkering nature I find myself going behind the Switch Panel every now and then to fish wires or grab onto existing wires for external switching etc. Anyway, the way the panel is screwed to the luan is fine for most everyone - unless you plan to remove the switch panel for any reason. I wanted the mounting screws to go into more than just the thin luan.

I used some scrap 3/4"x3/4" pine and Gorilla Glued the pine into place at the bottom and both sides. So the pine would stay in place while the glue dried, I ran screws into the pine through the Switch Panel screw holes. Couple hours later, removed the screws and reinstalled the Switch Panel. Way sturdier for the next time I remove and reinstall it.

Switch Panel Reinforcement - 1.jpg Switch Panel Reinforcement - 2.jpg
 

jbeletti

Well-known member
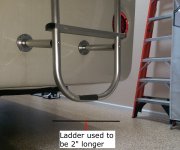
My Mods: Shortened RV Ladder by 2"

Due to the 7 degree slope of my driveway, I need to either remove my RV ladder or somehow shorten it. While my full-figured frame is a bit too heavy for the OEM ladder, I sort of want it back on the RV. Did you know the bottom loop of the Atwood ladder is not only easily breakable, but that the loop can be removed and replaced? At least I assume a replacement can be ordered.

Anyway, the loop is the same aluminum pipe stock as the 2 vertical sides of the ladder. Then there is a smaller aluminum pipe inside the loop so the vertical legs of the loop can slide up and into the vertical legs of the ladder at the first rung.

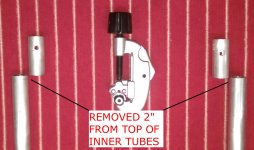
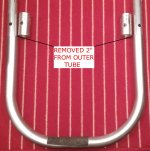
In order to shorten my ladder by 2", I needed to figure out a way to remove 2" of the outer tubes (legs) of the loop. But I could NOT remove those inner tubes. My guess is the inner tubes are really a single tube and is inserted into the outer tube and then the loop is bent.

I ended up using a tubing cutter to carefully cut through the outer tube without scoring the inner tube. It worked! I was able to remove a 2" long sleeve of the outer tube on both legs of the loop. I also removed 2" from the ends of both legs of the inner tube as well.

Edit (7-Apr): I invited a buddy to come by the house today and we reinstalled the ladder. We started by reattaching the horiziontal stand-offs to the flanges on the rear cap. Then we loosely reattached the ladder to the stand-offs. Next, using the same 8 holes but using larger screws, we screwed the ladder down to the roof. On the way down, we tightned the ladder to the stand-offs.

Next was to insert the now shorter bottom loop into the vertical legs of the ladder. The inner tubes of the loop slipped right into the vertical legs of the ladder. A slight tap of a wooden handle of a hammer seated everything nicely. Next, we had to drill new holes for the bottom rung (end cap screws and stand-off screws). Everything went great. All I need to do is float some Dicor self-leveling sealant on the screws and flanges on the roof.

Now I can back up my driveway and pull out of my garage and down the driveway without breaking off that bottom loop - as happened on the test run when I paid a dealer to bring a unit to my home as a trial. Oops :)


RV Ladder - 1.jpg RV Ladder - 2.jpg Ladder after shortening.jpg
 
Last edited:

ziggy

Retired Oregon HOC
Re: My Mods: Added Remote Control Caddy

My LM 365 came with these cool remote control caddys on each side of the bed. I guess you can use them for other things (glasses, phones etc.). Anyway, I ordered one from Heartland Customer Service and installed it next to my chair in the living room. I'm showing it with remote controls in it but I'm thinking of using it to store my cell phone and charge it in there at night. May have to drill a hole in the bottom to route the charging cord into it. For now, I did add 2 layers of shelf liner to the inside-bottom to cushion whatever I store there. I'm including the part number and description that was stuck on the caddy in case anyone else wants to order one from Heartland.
View attachment 35748 View attachment 35749 View attachment 35750

Jim,
The part number you have in the photo is the same one on our invoice. P/N 0171598 Basket-Small Powder Coated Black

Kristy

PS I know that the spending has just begun. Every time you get a new coach, there are things to do to make it yours.:)
 

jbeletti

Well-known member
Re: My Mods: Added Remote Control Caddy

Jim,
The part number you have in the photo is the same one on our invoice. P/N 0171598 Basket-Small Powder Coated Black

Kristy

PS I know that the spending has just begun. Every time you get a new coach, there are things to do to make it yours.:)

Thanks for the confirm Kristy - I added it to the text of my post.
 

jbeletti

Well-known member
My Mods: Shortened RV Ladder by 2"

The final picture and narrative have been added to this post (#104) of how I shortened and reinstalled the ladder on the rear cap of my coach.
 

travelin2

Pennsylvania Chapter Leaders-retired
Re: My Mods: Shortened RV Ladder by 2"

The final picture and narrative have been added to this post (#104) of how I shortened and reinstalled the ladder on the rear cap of my coach.

I removed the bottom loop completely from my BH to avoid contact to the earthen bank behind my home parking spot.


Sent from my iPhone using Tapatalk
 

jbeletti

Well-known member
Re: My Mods: Shortened RV Ladder by 2"

I removed the bottom loop completely from my BH to avoid contact to the earthen bank behind my home parking spot.


Sent from my iPhone using Tapatalk


I considered the same thing at first, but the way the loop connects to the bottom rung, without the loop - more work would have been required to make bottom rung safe for use. But yeah, I see where your use-case is different than mine.
 

travelin2

Pennsylvania Chapter Leaders-retired
Re: My Mods: Shortened RV Ladder by 2"

I considered the same thing at first, but the way the loop connects to the bottom rung, without the loop - more work would have been required to make bottom rung safe for use. But yeah, I see where your use-case is different than mine.

Upon a closer look at your photo I see the bottom standoffs on your ladder are different than mine. Therefore I didn't do anything other than remove the bottom loop !!


Sent from my iPhone using Tapatalk
 

jbeletti

Well-known member
Re: My Mods: Shortened RV Ladder by 2"

Upon a closer look at your photo I see the bottom standoffs on your ladder are different than mine. Therefore I didn't do anything other than remove the bottom loop !!


Sent from my iPhone using Tapatalk

Roger that. I think the ladder has been tweaked recently by Atwood. I know the flanges that mount to the coach have been changed. Changed as in "are better that what was used in the past".

Love your emoji - looks like Steve Austin, the Six million Dollar Man giving me the Eye from 10 miles out :)
 

porthole

Retired
Re: My Mods: Shortened RV Ladder by 2"

My Cyclone ladder was too long to store.
Since they are on the side, they are made removable. Sometimes the ladder sticking out another 8-10" on an already 101" wide trailer is too much.

I cut the ladder down to a manageable size and while in Elkhart one year I bought a short hang on ladder.
I then moved the new ladder’s standoffs to match the existing brackets.
I also added additional standoffs that use a rubber chair tip instead of mounting brackets.


//heartlandowners.org/showthread.php/11365-And-so-it-begins?p=82012&viewfull=1#post82012
 

jbeletti

Well-known member
Re: My Mods: Shortened RV Ladder by 2"

My Cyclone ladder was too long to store.
Since they are on the side, they are made removable. Sometimes the ladder sticking out another 8-10" on an already 101" wide trailer is too much.

I cut the ladder down to a manageable size and while in Elkhart one year I bought a short hang on ladder.
I then moved the new ladder’s standoffs to match the existing brackets.
I also added additional standoffs that use a rubber chair tip instead of mounting brackets.


//heartlandowners.org/showthread.php/11365-And-so-it-begins?p=82012&viewfull=1#post82012

Another nice mod Duane - thanks for sharing. Please show it to me when we see each other next.
 

dalspot

Well-known member
Re: My Mods: Screen Door Cross Bar and Closer Springs

I can't believe how much more stability that crossbar lends to the screen door! For a $10 part, it's worth it's weight in gold. Can't believe the difference when I go in someone's rig that doesn't have one!

The first mods I did to this unit was add the Screen Door Cross Bar and add the Screen Door Closer Springs. Both simple, inexpensive and useful mods that I do to each coach.

View attachment 35106 View attachment 35107
 

Nabo

Southeast Region Director-Retired
Re: My Mods: Screen Door Cross Bar and Closer Springs

Karen - the screen door bar was the first thing that we added to your new Landmark last year. Never had to put it to the "fall test" yet but sure makes one feel better.
 

TravelTiger

Founding Texas-West Chapter Leaders-Retired
Karen - the screen door bar was the first thing that we added to your new Landmark last year. Never had to put it to the "fall test" yet but sure makes one feel better.

Jim, Tony can tell you that bar can break a fall but the screen door may not fair as well. Our screen door is slightly eskew thanks to some slippery steps one day.


Sent from my iPhone using Tapatalk
 

jbeletti

Well-known member
My Mods: Added Entertainment System Equipment

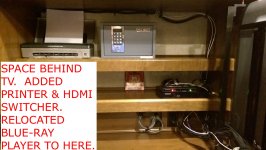
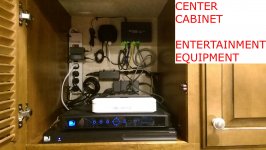
Today, I added/wired/rewired my entertainment equipment. The gear I have at this time is:
  • Samsung Blu-Ray / DVD Player (came with coach)
  • 47" LG LED TV (came with coach)
  • Samsung Sound Bar and Sub-Woofer (came with coach)
  • DirecTV Genie DVR Receiver
  • DirecTV OTA Tuner
  • Roku 3 Entertainment Appliance
  • Netgear Switch (to connect above gear and more to LAN/Internet)
  • Apple Time Machine (Networked computer backup device - back up my laptop to this)
  • MonoPrice 1x3 HDMI Switcher (switch DirecTV Roku 3 and Blue-Ray through here to TV HDMI 1)
The Netgear router above connects via Ethernet to my commuincation gearin order to be LAN available and Internet enabled.

Tomorrow I'll be adding a small USB hard disk drive to the USB port of the Roku 3. The USB drive will have digital media (movies, pictures and music). The Roku 3 can transcode digital movie files, show pictures and play MP3 music.

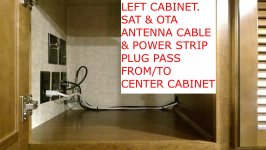
IMAG2999.jpg IMAG2998.jpg IMAG3001.jpg
 

klindgren

Retired Virginia Chapter Leaders
Re: My Mods: Added Entertainment System Equipment

How do you do this stuff Jim. I look at that last picture of the center cabinet and can not imagine how you figure all this out. ****, I can't figure out how to get my sound bar under the TV to work let alone all this other stuff. You make me jealous!!:confused::)
 

jbeletti

Well-known member
Re: My Mods: Added Entertainment System Equipment

How do you do this stuff Jim. I look at that last picture of the center cabinet and can not imagine how you figure all this out. ****, I can't figure out how to get my sound bar under the TV to work let alone all this other stuff. You make me jealous!!:confused::)

Sounds like Santa has had elves do this sort of thing for him his whole lide and has not had to learn it :)

But seriously, if you can hookup a DVD player, you can do this stuff. Prepare yourself to be "taken to school" when I see you in MB. Ask me anything and I will do my best to assist you and Carol. I enjoy it and, I want to "stay on the list" :)
 

2psnapod2

Texas-South Chapter Leaders-Retired
Re: My Mods: Added Entertainment System Equipment

Now get you a small piece of paneling and place it over all that and it would really be a VERY neat and organized setup! Nice job Jim. Looks like your used screw zip ties to mount everything to the wall.

Today, I added/wired/rewired my entertainment equipment. The gear I have at this time is:
  • Samsung Blu-Ray / DVD Player (came with coach)
  • 47" LG LED TV (came with coach)
  • Samsung Sound Bar and Sub-Woofer (came with coach)
  • DirecTV Genie DVR Receiver
  • DirecTV OTA Tuner
  • Roku 3 Entertainment Appliance
  • Netgear Switch (to connect above gear and more to LAN/Internet)
  • Apple Time Machine (Networked computer backup device - back up my laptop to this)
  • MonoPrice 1x3 HDMI Switcher (switch DirecTV Roku 3 and Blue-Ray through here to TV HDMI 1)
The Netgear router above connects via Ethernet to my commuincation gearin order to be LAN available and Internet enabled.

Tomorrow I'll be adding a small USB hard disk drive to the USB port of the Roku 3. The USB drive will have digital media (movies, pictures and music). The Roku 3 can transcode digital movie files, show pictures and play MP3 music.

View attachment 35990 View attachment 35991 View attachment 35992
 
Top