My thought is I really like the part about Lippert sponsoring your evaluation unit! Can I get a new Landmark to evaluate for you guys?
Working in a given industry has it's benefits
My thought is I really like the part about Lippert sponsoring your evaluation unit! Can I get a new Landmark to evaluate for you guys?
Unsure - it's a great hitch from a great company and I'm not removing it because I don't like it. It's just that I am going to try another direction.What will you do with the MorRyde?
Sure thing #2TravelTiger beat me too it! If she passes, I’ll take it.
I'm 75% certain I will go with the B&W 5th Wheel Companion hitch and use the gooseneck square shaft to connect it to the Ford bed 5th Wheel / Gooseneck Trailer option.
Decision made: Lippert Flex Air pinbox.
So I'm now 100% decided on using the Lippert Flex Air pinbox on the current coach, swapping out the MORryde pinbox. This decision was driven by the following factors:
Decision 75% made on Hitch selection
- Feedback from users who are using the Flex Air
- My personal experience using the Trailair in the past as well as the Trailair with Tri-Glide
- My strong desire to have some some of air ride / air cushioning in the pinbox / hitch area (since deciding to move away from the Trailersaver TS3 air hitch
- Lippert will sponsor my evaluation unit
If I go with the Andersen hitch, I will need to lock-out the lower jaw of the Flex Air (per Andersen and confirmed by Jamie W). Not sure I want to lock-out a feature of the hitch. Like Duane, I used the Trailair hitch with Tri-Glide. When it worked, it was one amazing hitch. But it was a maintenance nightmare. By combining the Trailair with their Roto-Flex, this "could" offer similar performance to the Trailair with Tri-Glide but without the bearing maintenance (and failure).
As such, I'm 75% certain I will go with the B&W 5th Wheel Companion hitch and use the gooseneck square shaft to connect it to the Ford bed 5th Wheel / Gooseneck Trailer option.
Thoughts on my pinbox decision and hitch "plan"??


The hitch is more my husband's area, but we have the Trailair Flex Air and a Curt Q20 for the Ram's OEM puck system. He wanted the B&W companion puck system, but their hitch height is 17" - 19" and the Curt's height is 14" - 18" so we didn't think we would be able to get low enough with the B&W Companion to be level. With the Ram's bed height being high the Curt was able to drop down further so that we are not nose high. That being said, we sure do look close with the Flex Air in the top holes of the Big Country's hitch (not sure of the technical name of that section of the frame) but the trailer's tire pressures are within a pound of each other while being towed so we're level going down the road.
I'm not sure how happy my husband is with the Flex Air yet since we had some form of frame flex after the first trip using the Flex Air. The Big Country's been out to Indiana and got fixed back in July and we've taken it on a few longer trips over the past couple months and everything seems okay now but he's still on the fence with whether he likes this current combination.
Agreed. Since my post you're replying to, I've swayed toward the puck system for the reasons I outline in an updated reply. Thanks!http://www.turnoverball.com/product...ion-oem-5th-wheel-hitch-fits-ford-puck-system. B&W has RVK3300 which fits the Ford pucks, no square shaft needed
Jim - I'm probably just not knowledgeable enough, but I use my Ford pucks. Don't understand why you would not use them. By the way, I love this system.Okay, now to decide which truck bed connection method to go with for the B&W Companion hitch. The choices are:
No Rails method, using the B&W turnover ball connection method - RVK3500 ($914). Requires the Turn-over Ball Underbed Mounting System - GNRK1117 ($539). Do NOT order the Ford 5th Wheel/Gooseneck Hitch Prep Package option ($375).
View attachment 54874
Benefits that I see with No rails method:
- No pucks in empty bed
- A bit narrower - about 2"
- A bit easier to remove
Pucks method, using the Ford Puck mounting system - RVK3300 ($997). Requires Ford 5th Wheel/Gooseneck Hitch Prep Package option ($375). Do NOT order the B&W Turn-over Ball Underbed Mounting System - GNRK1117 ($539).
View attachment 54876
Benefits I see with Pucks method:
- $81 less cost for parts and $0 labor for install
- Much more space behind the hitch as it's shorter (front to back). I want all the bed space I can get
- Less hassle up front by not having to contract out the installation of the underbed mounting system required for no-rails method
Summary
The net cost difference between the above 2 hitches is $200-300. Not significant enough to me to be a decision maker. The item that appeals to me most is having more bed floor space behind my hitch as I generally store side-by-side milk crates with 20# propane tanks in them. It's unknown if I'll have room between a tool-and-fuel combo box and the hitch to place my propane tanks, but I want all the room I can get
Any feedback on my leaning towards the B&W Companion hitch with Pucks mounting method?
Dick - I'm moving that direction. Waiting for others to convince me otherwiseJim - I'm probably just not knowledgeable enough, but I use my Ford pucks. Don't understand why you would not use them. By the way, I love this system.
Thanks for the feedback.Okay, now to decide which truck bed connection method to go with for the B&W Companion hitch. The choices are:
No Rails method, using the B&W turnover ball connection method - RVK3500 ($914). Requires the Turn-over Ball Underbed Mounting System - GNRK1117 ($539). Do NOT order the Ford 5th Wheel/Gooseneck Hitch Prep Package option ($375).
View attachment 54874
Benefits that I see with No rails method:
- No pucks in empty bed
- A bit narrower - about 2"
- A bit easier to remove
Pucks method, using the Ford Puck mounting system - RVK3300 ($997). Requires Ford 5th Wheel/Gooseneck Hitch Prep Package option ($375). Do NOT order the B&W Turn-over Ball Underbed Mounting System - GNRK1117 ($539).
View attachment 54876
Benefits I see with Pucks method:
- $81 less cost for parts and $0 labor for install
- Much more space behind the hitch as it's shorter (front to back). I want all the bed space I can get
- Less hassle up front by not having to contract out the installation of the underbed mounting system required for no-rails method
Summary
The net cost difference between the above 2 hitches is $200-300. Not significant enough to me to be a decision maker. The item that appeals to me most is having more bed floor space behind my hitch as I generally store side-by-side milk crates with 20# propane tanks in them. It's unknown if I'll have room between a tool-and-fuel combo box and the hitch to place my propane tanks, but I want all the room I can get
Any feedback on my leaning towards the B&W Companion hitch with Pucks mounting method?
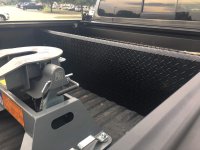
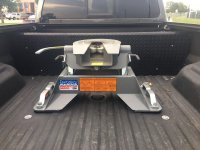
Thanks for the pics! Do you think you could fit the propane canister between the hitch and the tool box? Can you measure the horizontal distance from the inside front wall of the bed to the back of the front-most puck bracket? With that measurement, I can determine how much space I might have when I mount a tool/fuel combo box in the bed. Thanks!I really like the puck system, I had the turnoverball in my last truck.
I have a Retrax retracting bed cover, I "cut" up my cross bed toolbox and have it mounted between the bed cover canister (about 12" wide) and the hitch, I carry a 20# propane on the right side.
Unsure - it's a great hitch from a great company and I'm not removing it because I don't like it. It's just that I am going to try another direction.
But yeah, what do do with it. For now, probably store it on a moving dolly in my garage. May have to swap it back onto the coach before I trade it in another year or so. But if I end up not needing to do that - you are #1 on the list
I'm sure you've got the tools to do the Flex Air swap, but a little more info can't hurt. Having seen the Mor Ryde, I'm guessing the Flex Air is considerably heavier. It comes packaged in foam and what I did is use an engine hoist to get the pinbox and foam base onto the back of my truck (if you've got 3 strong friends, go for it). Before dropping it in the bed, I put some plywood sheets under it to gain some height. I then used the Level Ups to rasie the coach and simply backed the pinbox into the frame. Of course, I had someone guide me which made it go quicker. Easy peasy.
I then used a riggers steel bull pin (https://www.amazon.com/gp/product/B00093DYYM/ref=oh_aui_search_detailpage?ie=UTF8&psc=1) driven into the holes to do the fine alignment. The bolts went in without a problem. Also, I replaced the grade 5 bolts with grade 8 , torquing them to grade 8 specs. Depending on how it all lines up, you may need to "monkey" with the upper front nuts on both sides. You'll need an open end wrench to get in there and when you tighten up, the wrench will likely get jammed in the frame - a real pain to get out. I used a 1 1/2" flat prybar between the head of the wrench and the frame so it was a simple matter to tighten it up, push the prybar up and pull out the wrench and bar.
Sorry I don't have pics but it was December when I was doing this and I was shooting for completion, not a spread in Trailer Life.
Good luck and let me know if I can assist in any way.
BigGuy,
Thanks for the detailed description!!
But in the future, If you're going to share on the forum, prepare like it's Trailer Life. I need pics! LOL!
Sent from my iPhone using Tapatalk
Thanks for the pics! Do you think you could fit the propane canister between the hitch and the tool box? Can you measure the horizontal distance from the inside front wall of the bed to the back of the front-most puck bracket? With that measurement, I can determine how much space I might have when I mount a tool/fuel combo box in the bed. Thanks!

I'm sure you've got the tools to do the Flex Air swap, but a little more info can't hurt. Having seen the Mor Ryde, I'm guessing the Flex Air is considerably heavier. It comes packaged in foam and what I did is use an engine hoist to get the pinbox and foam base onto the back of my truck (if you've got 3 strong friends, go for it). Before dropping it in the bed, I put some plywood sheets under it to gain some height. I then used the Level Ups to rasie the coach and simply backed the pinbox into the frame. Of course, I had someone guide me which made it go quicker. Easy peasy.
I then used a riggers steel bull pin (https://www.amazon.com/gp/product/B00093DYYM/ref=oh_aui_search_detailpage?ie=UTF8&psc=1) driven into the holes to do the fine alignment. The bolts went in without a problem. Also, I replaced the grade 5 bolts with grade 8 , torquing them to grade 8 specs. Depending on how it all lines up, you may need to "monkey" with the upper front nuts on both sides. You'll need an open end wrench to get in there and when you tighten up, the wrench will likely get jammed in the frame - a real pain to get out. I used a 1 1/2" flat prybar between the head of the wrench and the frame so it was a simple matter to tighten it up, push the prybar up and pull out the wrench and bar.
Sorry I don't have pics but it was December when I was doing this and I was shooting for completion, not a spread in Trailer Life.
Good luck and let me know if I can assist in any way.